Saturday, May 25, 2019

Eggrooms


It's a rainy day here in the San Juan Islands... a perfect day for eggrooms.

Whoa - what's that?

Eggrooms is a recipe that I invented nearly 50 years ago for a romantic morning after breakfast. I've never seen it published anywhere... before now.  So the secret is now officially out.

A good blogger would have pictures, both intermediate and finished.  I'm a hungry blogger.
This is way easier (especially for one who fears flipping floppy things with a spatula) than a mushroom omelet.

Ingredients

  • Mushrooms, sliced 1/8" thick
  • Four eggs
  • Butter
  • Garlic salt
  • Pepper
Start by slicing enough mushrooms 1/8" thick to cover the bottom of your non-stick frying pan.  Try to make the slices uniform in thickness so they all will cook at the same rate.

Melt a tablespoon or so of butter in the pan and saute the the mushrooms over medium heat until they are getting golden brown edges on the bottom side.  Don't try to turn them over - you can't, and even if you could by the time you get the last one done, the first will be over-cooked.  Romove the mushrooms from the pan, retaining as much of the butter in the pan as possible.

Did I mention that I am spatula impaired?  I can only handle two eggs at a time.

Return half of the mushrooms to the pan and arrange them into two circles, more of less, with the centers large enough to contain the egg yolks.  Crack two eggs into the mushroom circles.

Sprinkle with garlic salt and pepper.

We like our eggs over easy - cook as you would normally

Prepare the second two eggs the same way.

You will find eggrooms to be as tasty as a mushroom omelet, but in a different way...

Enjoy!


Wednesday, May 22, 2019

The First Time...

[As I write this, we are at anchor in Blind Bay, a gentle breeze riffling the water and the Sun flashing diamonds into my eyes off the water...]

The first time is always a little scary, no matter how many times you have done it.

Getting 50,000 lbs to do what you want in the close confines of docked boats, with no brakes, ineffective steering, and a strong tendency to move to port whenever the engine is engaged definitely requires experience.  And wisdom.   And after so many months of Eolian resembling nothing so much as a cabin on the water, and me, well, forgetting what it is all about...

But God smiled on us - He gave us a morning with absolutely no wind to interfere with maneuvering in the close quarters at the dock and a lovely day to cross over to the San Juan islands.  Getting free of land was uneventful.  {I'd say it was easy, but that would truly be tempting the fates...}


Under way, finally

 Of course, with no wind at the dock it would be unreasonable to expect wind down Guemes Channel and across Rosario Strait, right?  So we came across with the diesel engine.

But as soon as we cleared Thatcher Pass and were in the Islands proper, we were faced with 21 knots of cold wind, right on the nose.  No chance for sailing there either.  But somehow by the time we entered Harney Channel and finally turned into Blind Bay, the wind had dropped to a gentle, warm 5 kt.

So, here we sit, at anchor, a glass of wine in my hand, the flag flapping quietly off the stern, and diamonds flashing into my eyes.

And now in their old arrangement, the Canadian geese are honking in their nightly takeover of the nearby rocky islet from the American geese who seem to hold it during the day, in some kind of weird truce...

It is good to be off the dock!


Saturday, May 11, 2019

Mainsail Stack Pack is Done

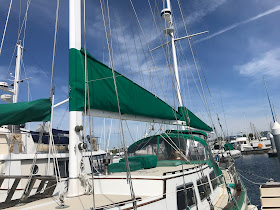
This weekend I completed the last portion of the mainsail stack pack sail cover.

Wait... "stack pack" - what's that?

A stack pack is kind of like a basket - it captures the sail when it is dropped and keeps it from going all over the place.  Yes, lazy jacks do that too.  In fact a stack pack uses lazy jacks, but it also serves as a cover for the sail when it is not in use - there is a zipper along the top surface which closes the stack pack over the furled sail.

For our mainsail, the stack pack is 18' long - much, much too big to do the fabric lay out inside the boat - I did it on the finger pier next to us.  Because of the height of the sail when furled, the fabric wasn't wide enough so I had to splice a panel at the forward upper end of each side.  Somehow I managed to not take any pictures of the process.

Needs Viagra
When the sewing was completed, it needed to be fitted to the sail and boom.  This turned out to be a non-trivial task.  There is a lot of fabric, the sail is heavy, and there is lots of opportunity to get the straps that go under the sail hooked up to the wrong places.  It took me most of an entire afternoon to get to the point in this picture.

Next the lazy jacks needed to be disconnected from the boom and attached to the sail cover, and adjusted so that the (PVC pipe) battens formed a pleasant curve.  This required a ladder.

Finally, a piece of canvas (lined with sailcloth for added stiffness) needed to be cut to serve as the front cover.

Front cover pattern
I picked a day when it was sunny, warm, and calm (a rare event!) to make the pattern using Sailrite's Duraskrim (highly recommended!  In fact, Sailrite is highly recommended...)

Long time coming - done!

Then a morning of stitching on the Sailrite LSZ-1 produced the product.  Looks pretty sharp!  The stack pack also eliminates the 1-hour long procedure of reinstalling the old sail cover over the sail after arriving at the dock, and eliminates storage of that cover down below while we are off the dock... hooray!

Next on the agenda is a new cover for the staysail - the old one has shrunken to where it can't be made up over the sail anymore.


Wednesday, May 1, 2019

Closure

I have to give all 3 of you patient readers closure on the generator issues...

It's done.  Finished.

I filled the fresh water side with water/antifreeze mix, opened the seawater valve and started it.

There were two problems.  The first was apparent even before the engine fired - diesel mist was escaping from the exhaust elbow flange.  I had been gentle with the 8 mm dia bolts that hold it on, fearing that I could strip or break them.   Apparently I had been too gentle.  A little judicious torque applied to the bolts solved that problem.

Next, after a few minutes of running, the engine started to slow down in what all of us with diesel engines recognize as the dreaded 'air bubble' somewhere in the system.  I bled it again (and got out some more air) but that didn't solve the problem.  Apparently there was now a bubble between the injection pump and the injectors.  Finally I started it up and applied a load (the water heater) which caused lots of diesel to be injected into the cylinders.  That did it - the air was swept out, leaving behind a smooth running engine.

So, this may be the longest oil change on record...  I started the oil change on 3/23, and here we are at the first day of May.

Gratuitous picture showing the finished product, again


Previous post in this series
Next post in this series