Monday, April 25, 2016

Exhausted

Remember, a few posts ago when I went Uh oh...?

Well, the time finally came up.  I wedged myself into a small, wedge-shaped compartment right next to the refrigeration compressor (Turn it off!  And more importantly, remember to turn it back on...).

As my body slowly became more compliant with the wedge-shaped space, I had to, slowly, with only a couple of inches freedom of movement, saw out a section of the exhaust hose.

Why just a section?  Well, this stuff is about as flexible as a 3" diameter tree branch.  There is no way that I would be able to bend it enough to get one end off of its pipe while the other end is connected - it's only 18" long.  So I chose to cut out a section from the center, which would give me enough freedom of movement to deal with the two remaining ends.


Ugly, isn't it?
So, over the course of a few hours, I was able to make the two necessary saw cuts thru the heavy, multiple-wire reinforced rubber.  What came out, after I re-inflated my body to its normal shape, was pretty ugly.


Looking at the cut end that passed thru the external salt deposit (I cut it there on purpose), you can see that the thin outer layer of rubber is loose from the bulk of the hose.  And closer examination shows that that bulk rubber at that location is actually completely cooked - hard as a rock and fractured, barely hanging together.

How did this happen?  The exhaust gases are water cooled.  Well, this is the top of the hose, near the water lift muffler.  Nearly the worst possible location if the water flow was weak (by the time it got here, it would probably be just running along the bottom of the hose).  And there have been some occasions over the years where raw water flow thru the engine was reduced.  I think this is the eventual consequence, come back to haunt me a lot later.


This is the tool that I used to cut the hose.  It is a handle especially designed to take Sawz-all blades.  I have a metal cutting blade chucked in it for this job.  It is really the only tool that I could have used to make these cuts, given the space constraints.


For the removal of the two end pieces of hose, I pressed a Dremel tool into service, using a tiny cut-off wheel.  It sliced thru the rubber and the wires with ease.  I had originally been worried about cutting too deep, marring the sealing surface of the pipes, but that was unnecessary.  Those wires are so hard and springy that as each was severed, it opened up the cut more.  It was not necessary to cut the rubber beneath the wires - their tension tore it.

Now all I have to do is bend a piece of new hose enough to get it in the space, and over the pipes at each end.  Sounds easy right?  A story for another time...

Share/Bookmark

Monday, April 18, 2016

Canvas - Round Two Completed!

Round two of cockpit canvas replacement - the roof section of the dodger - is done!  Here's how it went:

Topstitching the aft tail seam
Having completed the actual construction of the panel, I needed to create the attachment to the "windshield" portion of the dodger. The original canvas had the roof and the windshield sewn together, making a hugely unwieldly thing, almost impossible to handle with all the compound curvature and the easily damaged vinyl.  As I reported last time, I made a design decision:  The new roof panel would be separate, and attach to the windshield via Common Sense fasteners.

So, how to locate those fasteners?  For a taut roof panel, the fasteners need to be in the exact right spot, and further, the eyelets and male portions need to end up in registration with each other.  How to do this?  I solve problems like this as I am falling asleep and letting my subconscious work on them.  This is the procedure I came up with: 
  • Mark, on the tuck back tail of the new roof panel the desired location for fasteners - this portion will show in the final installation
  • Place the new roof panel in place, carefully aligning the sides, and positioning the front seam on the front surface of the tube, as designed.  You'll note that the old panel seam (built by a professional) missed the tube by as much as an inch in the center.
  • Insert T-pins at the marked locations.  By pushing them all the way in, they made a good solid temporary connection because the vinyl in the windshield gripped them, allowing tension to be applied so that wrinkles could be worked out.  Adjust the T-pin locations in the windshield as required (keep the pin locations in the tail as marked since, again, these will show) and reposition as needed for a good fit everywhere.
  • Mark exactly the T-pin locations on both the tuck back tail, and the windshield.  To mark the windshield, pull a pin part way out, giving enough room to work under the tail, but keeping the location established.  Since this is all done with the existing canvas all in place, it is easy because the old roof panel is keeping the windshield tensioned and in place.

T-pins for alignment
  • Pull the new canvas off
  • Punch holes in the windshield using Sailrite's Common Sense punch...  this is the only way to do this, given that 4 layers of Sunbrella and the vinyl need to be cut.  Jane was inside, with a buck made out of a 6" piece of railroad track with a piece of Starboard taped on as the working surface.  Without something to work against, the punch would not have worked.
  • Install the eyelets in the windshield.
Holes punched and eyelets installed
  • Install the male portions of the fasteners on the tuck back tail of the new canvas.  Getting the male fastener mounting holes in the right place cannot be done by eyeball.  I made myself a jig out of an old blank non-silvered CD, by drilling holes at the correct spacing and then marking the outline of the fastener and horizontal and vertical centerlines.  This can then be held in place on the marked T-pin location and a pen can be used to mark the rivet locations thru the holes in the jig.  (Sailrite?  Are you listening?  You need to sell something like this...)
Homemade drilling jig

  • The moment of truth: Test fit.  Will everything work?  In order to get a true assessment, I disconnected the rear of the old canvas from the rear tube and installed the new canvas completely.  Since the old roof canvas was still attached to the windshield, it hung down inside.  Yup, it looked good.
Test fitting
OK, punching the holes in the windshield was a commitment, but not a serious one...  Eventually tho, it was time to make the big jump, and say "I do."  So I cut the old roof panel off of the windshield and voilĂ , c'est fini!

Done!

And man oh man is it good to see the old faded canvas as a jumbled up pile (and eventually in the dumpster) instead of gracing the cockpit!

Good riddance!

Now there is only one more roof panel to make - the center section.  This is much simpler to construct, being a single panel of cloth with only edging installed.  Ah, but exact sizing and zipper placement are critical for a taut installation.  Gotta think about this...


Share/Bookmark

Monday, April 11, 2016

What Was The Question?

Sixteen or seventeen years ago,when Jane was walking along the boardwalk at Shilshole, something tiny and yellow caught her eye.  She picked it up: a yellow Barbie high-heeled shoe.

When she got back to the boat, she placed that shoe atop our VHF which is mounted on the overhead just as you come down the companionway... 

Yup, it's still there...

The operative question I have is... Why?  What was the question this placement answers?
  • Was it to test Eolian's stability?
  • Was it to see if the VHF is mounted at the Eolian's center of motion?  (It is, pretty nearly...)
  • Was it to test me in some way?  If so, I have missed the cues...
  • Was it associated with the rest of her shoe collection in some way?
All I know for sure is that the little yellow shoe is still there.  And that Jane checks periodically to see that it is. 

But she won't tell me why.

And I know better than to disturb it...


Share/Bookmark

Wednesday, April 6, 2016

It's Spring In The Skagit Valley

When traveling between our log home on Camano Island and Anacortes, we pass thru the Skagit Valley. Why would I be talking to you about our commute route?

Well, because this:


What better way to shed the winter blahs than to gaze upon 100 acres of daffodils? OK, I'm not a farmer, so my estimate of the field size is "unofficial", but it is huge.  And it is one of many, all filled with a riot of daffodils, and they're all screaming, "WaHOO! It's SPRING!"

And then, just when the daffs are about spent, and the fields begin to take on a bronze hue, it's time for the tulips!

Again, I'm no farmer, and it changes from year to year, but I think there must be more than twice as much acreage devoted to tulips as there is to daffs.

Because there are more of them, and because they come in so many different colors, the fields full of tulips are stunning.  And the farmers seemingly plant them so that adjacent colors spark off of each other.

Like for any crop, good farming practice demands crop rotation.  And this year, the fields next to the road our route takes us on are being devoted to other things, so all the tulip fields are pretty far in the distance, making for crummy pictures.  And for copyright reasons, I won't snag some of the gorgeous pictures out there...  but I will make it easy for you to see them:  Just click here.

If you are in the area, things are at their peak right now.  Avoid the crowds and drive up here Thursday or Friday...

Skagit valley comes to Eolian


Share/Bookmark

Monday, April 4, 2016

Corrosion, Corrosion

For a boat on salt water, corrosion is an omnipresent demon.


Even inside.  This is the spout on our galley sink which is piped to a saltwater foot pump. And to the cooling water discharge from our 12V refrigeration system, meaning that it has saltwater flowing out of it whenever the refrigeration compressor is running, as a telltail. Look closely at the inside of the right-hand bend... yup, the aluminum has corroded thru. I don't understand this... aluminum is supposed to be reasonably proof against saltwater.  The pipe is clamped to the sink in a plastic fixture, and is connected below the sink via vinyl tubing...  ruling out galvanic corrosion.  The entire refrigeration system is 12V, so stray 110V current cannot be an issue.  The compressor is powered by an external motor thru a V-belt. 

But.

The motor and compressor are mounted on the same metal plate, and there are some pressure switches to control the motor mounted on the compressor.

Is that enough to cause stray current corrosion, tho there is no direct connection between the refrigeration unit and the aluminum tubing except via the saltwater itself?

Or is the corrosion simply the result of flowing saltwater washing away the protective oxide layer on the inside of the aluminum tubing?  I am very interested in what the net.wisdom has to say about this...

Regardless, this is the second spout that I have installed there, and they have gotten ridiculously expensive.  I am not planning to buy a third one.

Two pieces of 7/16" stainless tubing
Instead, I bought some thin-gauge 316 stainless tubing from Online Metals.  Now, if you've ever attempted to bend tubing, and especially thin-gauge tubing, you know that it requires special tooling to prevent kinking.  The tooling constrains the tube so that it can't collapse and kink while it is being distorted.  I looked up what a tubing bender for 7/16" tubing costs on the Interwebs, and Oh. My. Gosh.

OK, a Plan B is needed.

It is also possible to prevent collapse/kinking if the tubing is filled solidly with something incompressible.  Apparently some people have used ice (fill with water; freeze), but I was concerned that I'd never get the tubing bent before the ice started to melt.  This is where Wood's metal comes in.

This is Wood's metal - it is a eutectic alloy of 50% bismuth, 26.7% lead, 13.3% tin, and 10% cadmium by weight.  It melts at 158°F
I just happened to have some. 

Wood's metal foundry
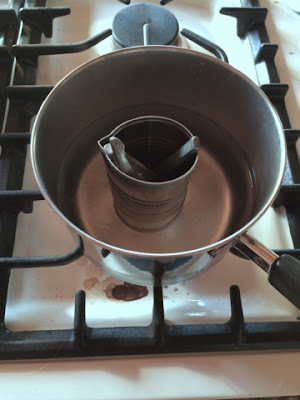
For a foundry, I purpose-bought a can of tomato paste (69¢), and froze the tomato paste, retaining the can - just the right size.  I put it in a pan with some water and brought the water to a boil - 212°F, or about 50° of superheat.  I then poured the molten metal into the tubing (I had previously blocked one end of the tubing by pushing it into a wine cork - we seem to have plenty of these).  I then immediately plunged the filled tubing into a container of cold water - I had read that quenching creates a fine crystal structure in the Wood's metal, making it more ductile (read: easier to bend).

OK, now to bend.  I created a bending jig and lag-bolted it to a 4x4 in our shed:

Homemade bending jig
Yup, it bent just fine - no kinking, no collapse.

Recovering the Wood's metal
All that remained was to reheat the bent tubing in another boiling water bath to remelt the Wood's metal and pour it out.

And since our galley sink has two of these spouts (one for salt water and one for fresh water, foot-pumped from the tanks), I made another spout.  Gotta be symmetrical, don't you know.


Done
(Clever camera angle conceals dirty dishes in the sink)
A little boat yoga, and the galley sink looks better than it ever has!


Share/Bookmark
Related Posts Plugin for WordPress, Blogger...