Tuesday, March 30, 2010

Project: 12V Power in the Office

A tiny little project from July, 2007 - one of those small improvements that make life onboard  more convenient.


We have several hand-held devices that can use 12V power to recharge their batteries:
  • Our cell phones
  • The remote speaker/mic for the VHF.  By the way, this is a wonderful invention.  It allows me to have the "VHF" with me wherever I go on board, even tho the VHF is mounted inside at the top of the companionway.  It beats a hand-held VHF, in that it uses the real thing, with it's full 25 watt power and antenna mounted on top of the mast.  But most importantly, it allows me to turn down the volume on the main set so that it doesn't irritate Jane, and keep the mic beside me at the helm, thereby promoting bliss under way.
The most obvious place for setting up access to 12V for these devices would be in either the nav station, or the office.  I chose the office, because nearby shelving was suitably equipped with fiddles to keep things in place under way.  And because the nav station always seems to be crowded with other stuff.

First, where to get the power?  I chose to tap into the port side lighting circuit, mainly because that is the only 12V wiring in the office.  So, step one was to remove the paneling covering the hull liner (Eolian has a hull liner) and thereby expose the wiring.

Next (after opening the breaker to stop the sparks), I cut the lighting wire at the junction where the power for the overhead light was taken off.

I drilled a suitable-sized hole in the paneling down by the shelving, next to the existing 120V outlet.

Voila! After adding a new lead to the new outlet, splicing up the wire and replacing the paneling, the outlet is in place.

And we now have a charging station!
Share/Bookmark

Sunday, March 28, 2010

Timing is Everything

Yesterday, Angela from Ghost, right across the dock from us, reported that there was a whale in the marina, inside the breakwater, right off their stern. In her words:
We saw a 30' whale in our marina right behind our boat. It was amazing. Not sure exactly what kind, but it looked like a gray or minke. Very cool. I love living on the water.
We missed it.

We weren't there.

Darn.
Share/Bookmark

Thursday, March 25, 2010

Facebook?

I'm not much of a Facebook-er, although I do have an account. It seems that Facebook is a going thing, so in order to get into the spirit of things, I've put a Facebook sharing widget down there at the botom of each post.

Maybe you all can teach me how to Facebook.
Share/Bookmark

Wednesday, March 24, 2010

I Learned about sailing from that: Carrying the Mainsail Downwind Too Long

I apologize if you have seen this post before. It ended up with the wrong date in Google Reader, and therefore was invisible to anyone who uses that tool to see this blog. As a correction, I am re-posting it and deleting the old version
In 2004 we made a trip up to Desolation Sound. Because of the path we chose, we had to cross the Strait of Georgia at its Southern end, and then sail most of its length from South to North. The Strait of Georgia is a large body of water, and can experience some prodigious wind, which can produce significant wind-driven swell.

We will join our log, picking up the thread as we were leaving Silva Bay:

We were excited about crossing the Strait of Georgia.. we both woke up before the alarm, and it was set for 06:00. So we got off pretty early - the log shows 06:40. We motored out of Silva Bay and into the Strait, and found a 10 kt SE breeze. Great! We hoisted all the sails, but soon found that our course was forcing us to choose between the yankee and the mainsail - the main was blanketing the yankee, and it was impossible to keep it filled and stay on course. So we rolled up the yankee.

As the morning wore on, the wind built. It had been forecast as 10-15 kt, but those darn Canadians! After it went over 20 indicated, we had to get more sail off as the boat was getting severely overpowered... steering was becoming difficult. Clipped into the jackline, Jane went forward and gave a mighty effort. To no avail.
Now, Eolian's mainsail is 391 ft2- a 1XX lb woman is simply no match for it when it is full of 20 kt of wind. So - there we were - barreling up the Strait of Georgia, the mainsail winged out, too much sail on the boat and steering becoming more and more difficult. Driven by the rising wind,the swell was rising too, contributing to the steering problem.

What to do?

It was obvious that we needed to turn the boat into the wind to take the wind out of the main. But the swell was high enough now where that was becoming a risk in itself. Here's what we did: I started the engine so the prop thrust would make the turn as quick as possible. Then I tried to time the turn so that we would be most of the way around by the time we were seeing the next crest. This meant that we had to start the turn as a wave was beginning to pass under us.

It worked, more or less. It was a wild ride, but we didn't broach, we didn't dip the boom into the water, and Jane quickly got the main down (hooray for lazy jacks!). But the cabin was a mess. Lots of things got loose from their sea rails and found their way to the floor. Books, for example. It seems like most of the paperback books we had on board were on the floor. However, nothing was broken.
We finally dropped the sails (just the mizzen and stays'l... the two sails I have always regarded as somehow "extra" - and here they had powered us most of the day) and put into Ballet Bay, at the entrance to Jervis Inlet. Even there tho, the wind continued to plague us, swinging us back and forth on the anchor until very late.

Learnings:

  • Sailing downwind can be deceptive. Wind speeds are higher than they seem, and you can become lulled into a false sense of the real situation.
  • A mainsail full of wind cannot be dropped. A yankee can.
  • A strategic error was made early in the voyage when we dropped the yankee because it was being blanketed by the mainsail. We should have dropped the main.
  • Reduce sail early. It is easier to add sail in a dying wind that it is to get it off in a rising wind.
  • When to reduce sail? When the thought crosses your mind. If you are thinking about it, you probably should be doing it.


Years ago when I was a kid, I used to read Flying magazine. I particularly enjoyed a long-running series of articles entitled "I Learned About Flying From That." Each article was written by a pilot, who humbly admitted to having made a mistake, and then having lived, told about it in the hopes that others would not have to make the same mistake. I thought then that it was a good format, and I still think that now. This series of postings is my attempt to recreate that article series with a new subject and new technology.

(If you would like to help others to learn from your mistakes, please send your article to: WindborneInPugetSound at gmail dot com)

Share/Bookmark

Google Reader

Have any of you other bloggers noticed this?

Sometimes when I put up a new post, Google Reader picks it up almost immediately (What? You don't monitor your own posts? You should. Hover your mouse over the "received" date to see the published date.)

But sometimes, the delay between posting and appearance in Google Reader is an hour, or more.

And sometimes, like with the post I made last nite, it is just plain wrong. Google had the post listed as being made on 3/11, and therefore it didn't even show up in the new postings, and in fact would never be visible to those using this tool.

So I reposted it.
Share/Bookmark

Sunday, March 21, 2010

Elegance


Scott and Angela of Ghost dressed up for a charity auction on Saturday, proving that not everybody who lives on a boat wears groady deck shoes, and jeans out at the knees all the time...

They look great, don't they?

And yes, all you Captain Ron fans, those are little strappy high heels that Angela is wearing.
Share/Bookmark

Thursday, March 18, 2010

Crabs, Part 2: How to get 'em

Crabs.  In Part I, we talked about their personalities.  Now this may seem frivilous, but as it turns out, the key to catching crabs is understanding what motivates them.

In a word:  GREED.

They are not wily.  They are not shy.  They are not subtle.  So, to catch them,  you don't need to be any of these things either.   You just cater to their greed.

In Puget Sound, you will see two primary tools in use for catching crab.  The simplest and cheapest is the crab ring.  Now, that is kind of a misnomer, since the crab ring is actually two metal rings, a smaller one and a larger one, linked with netting.  When dropped onto the bottom, it lays flat, but when hoisted up, it forms kind of a net bucket.  It is attached to the line by a three-legged harness which should have a float on it so that when the ring is dropped into the water, it lands right-side up.

How is the ring used, you might ask (if you've read this far)?  It is simplicity itself.  You tie the bait securely to the netting inside the smaller ring, and throw it in the water.  Wait 20-30 minutes (or maybe a little longer for the first pull), and then retrieve it.  Bait?  There are lots of suggestions here, but we have found that a turkey wing or drumstick neatly fits into the intersection of cheap, easily available, easy to attach securely and satisfying crabs' greed.  Now, that's twice I have said it:  Tie the thing on securely, or a crab will haul it off.  They are not weaklings...  you will sometimes find that they have broken the bone in the drumstick.  After a couple of hours, the best of the juices will have been leached from the drumstick, and the crabs will no longer be able to smell it as well in the current.  If you don't have enough for dinner yet, you will probably want to replace the bait.

But, if you don't have enough for dinner after a couple of hours, you should probably try a different spot.  Which brings up the second question:  Where to put the ring?  Eating-sized crabs prefer deeper water - say 30-50 feet.  But that's the ideal.  We like to just crab off the boat while we are at anchor.  In some places (Port Madison, for example), it doesn't pay because the water is so shallow - all you get are babies.  When crabbing off the boat at anchor, be sure to veer enough line so that the boat tacking back and forth on the anchor doesn't drag the ring all over the bottom.  Oh, and Jane says she has better luck on an incoming tide.

The other device in use on Puget Sound is a crab trap.  These are (usually) steel mesh enclosures with little flaps that the crabs can open to get in, but can't open from the inside.  These are set-and-forget devices.  You bait them and put them over the side in a likely place, coming back hours later to retrieve your catch.  Since these are left unattended, there are rules for the kind of float used to mark them on the surface, and the kind of line used to attach the float to the trap.  Knowledgeable crab trappers tie the bait to the inside of the top surface of the trap, or use a bait box.

Whichever device you use, you are eventually going to bring it up, full of crabs.  Now what?

First, you can't keep everything you catch.  There are size limits, and they really do make sense.  Anything smaller than the allowable limit is going to be too small to bother with eating anyway.  Second, for Dungeness crabs anyway (that's what these in the picture are), you cannot keep females.  The overturned crab in the picture is a male - see that triangular-shaped plate on his belly? On a female, this plate is much wider and kind of rounded.  For the other kind of crab commonly caught in Puget Sound, the Red Rock crab, the size limits are different and you can keep either sex.  They are easy to distinguish from the Dungeness, because they are more stretched out side-to-side, and because they are, umm... red.

Whether you are going to keep them or throw them back, you have to get them out of the netting or the trap.  This can be kind of tricky for the uninitiated.  When you reach for a crab, you will quickly see how aggressive they are.  They will rear back and wave their claws at you, trying to clamp on.  The only safe way to grab a crab is from the back - and they know this, so they will try to prevent you from doing it.  If you can turn the crab onto his back, he will shortly and magically go passive - like the one in the picture.  Then they are easy to grab from the back.  If you continue to hold them upside down, they will stay passive, like the two live Rock crabs I am holding in the picture in the part I post.  You must work quickly - they will soon be scrabbling all over the deck, going every which way.

Now, I am going to leave you, holding that crab upside down from the back, until the final installment, where I will take you to that final messy joy of cracking and eating crab.

Don't let him go.
Share/Bookmark

Tuesday, March 16, 2010

Boat Whispering

When it is very quiet, Eolian whispers to us.

Even when there is no wind, there is motion, and with that motion, the boom swings back and forth a tiny bit.  Oh, we sheet it in tight, but eventually, it works just enough slack that it can move.  And when it does, the sheet blocks creak, ever so slightly, rhythmically.  You might think it would be irritating, but it is not, no more so than your own heartbeat.  She is talking to us, saying, "I am alive, and everything is good."

The solar vent chuckles to itself, moving air thru the bilge.

And when the wind picks up, as it has tonight, there are new voices.  The wind sighs past all the wires that hold up the mast - each hums with its own voice, but somehow they are in key, in harmony.  And now the staysail boom moves back and forth (tho also once sheeted in tight) adding a rhythm, syncopated with the mainsheet blocks.  Occasionally, a halyard will tap against the rig somewhere, making a hollow echoing kettle drum sound as the impulse travels up 60 feet of 3/8" wire and down the other side.

With rising wind, there is the occasional liquid splashing sound as a wave meets the hull and says hello.  And the fenders begin to speak, creaking as the hull compresses them against the dock.  And now we can hear the harp of our neighbor boat's solid rigging.  Being rod rigging, it makes a different sound in the air.  On our starboard side, our other neighbor has a wind generator - it adds a kind of brush-on-a-snare-drum sound.

So it is never actually silent, living aboard here, Eolian is never speechless.  Even in a calm, she whispers to us as we sleep,

"Everything is good."
Share/Bookmark

Sunday, March 14, 2010

Spring Ahead!

Last fall, when we "fell back", that signaled the end of the possibility of sailing to Port Madison on a Thursday nite after work because of the loss of daylight (I don't work Fridays.  Or Mondays.  Yea!).

Well, what was gone has returned!  The prodigal hour of daylight is back in the fold,  and there is now time for a brisk sail or to motor across to Port Madison in the evening.   

And in an amazing bit of synchronicity and homonymity (I just made that up), the threat of the worst of the winter storms is over, so we can single up the spring lines that  were doubled last fall.

These two changes spark a subtle adjustment in me.  I don't suppose it's visible on the outside, but in a shifting of mental framework, I no longer see Eolian as the teak-lined apartment that has housed us thru the winter.  She is returned to being a boat.
Share/Bookmark

Thursday, March 11, 2010

How is this possible?

In 2004, we had a prodigious snowstorm in Seattle.  In fact, it snowed so hard and so fast that there was snow floating on top of the seawater in Eolian's slip.

At first glance, this looks like ice floes, but it was not.  A quick probe with a boat hook showed that it was actually slush cakes.

So, how is this possible?  This is, after all, seawater, and at a temperature of something like 45 °F to boot. 

My theory is that the snow fell fast enough that a layer of fresh meltwater formed on top of the salt water.  Because fresh water is less dense than seawater, that arrangement was stable.  And because the water came from melting snow, it was cold.  Add enough snow, quickly enough, and the water would be near 32 °F, cold enough for slush to be stable.

And it was stable - the snow "floes" lasted for more than an hour.

That's my theory anyway.  Maybe one of you from a cold weather port can substantiate it, or debunk it.

And why am I posting this just now?  Because winter has returned to Seattle, at least for now.
Share/Bookmark

Tuesday, March 9, 2010

I learned about sailing from that: Single Handing in the Fog

This is a guest column written by Livia aboard SV Estrellita 5.10b. This is an expanded version of the original post, written specifically for Windborne in Puget Sound.

I first single handed our 35' Wauquiez Pretorien from Friday Harbor, WA across the Strait of Juan de Fuca to Port Townsend, WA and then on to Edmonds, WA. I was nervous and spent a great deal of time focusing on heavy weather, sail plans, solo anchoring and potential in-boat emergencies.

To avoid solo docking which I had not yet practiced, my husband sailed with me from Sidney BC to Friday Harbor to clear customs and my father arranged to meet me at the docks in Kingston, WA where I would touch-and-go to pick him up before heading into the Edmonds marina. I planned an overnight stop on anchor at Port Townsend.

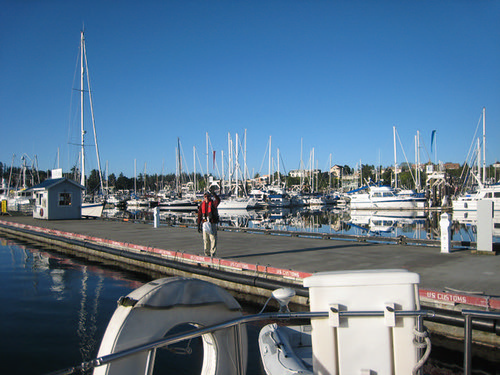
I left my husband Carol at the customs dock in Friday Harbor after anchoring out overnight in the harbor:


Just South of Friday Harbor in San Juan Channel I saw a fog bank in front of me:


Here is where I went wrong. I should have gone back to Friday Harbor and waited out the fog. Instead, I thought I would go "through it". Of course, there is no "through it". There is more fog.

So with radar, my fog horn, and Navsim electronic charting software I emergency navigated into MacKay Harbor.

Our GPS antenna which had been sporadically losing connection began sporadically losing connection while in the narrowest part of San Juan channel. I could see other boats, mostly small fishing vessels, on radar but my visibility was down to a few boat lengths. I honked my horn at any contact and spent that hour running up and down to the radar screen at the nav table and back to the cockpit.

I used the radar to complement my electronic charts to verify that I was, in fact, where I thought I was in the channel because I could not see the sides. I also used the radar to verify my route through the rocky islands.

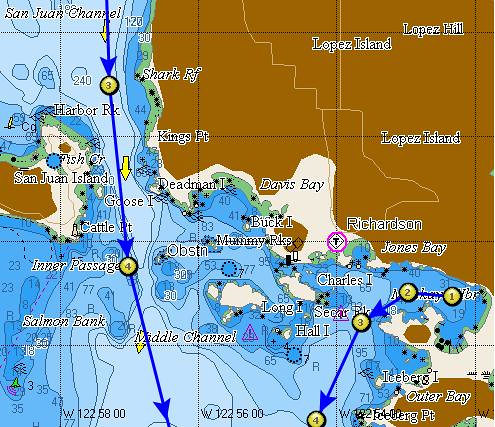
You can see my planned route due South and, after anchoring, my new route out of MacKay Harbor:


In addition to radar, electronic charts and my fog horn I also hoisted our radar reflector and called my husband to give him my coordinates and the situation.

Once inside MacKay Harbor I dropped anchor in the relative middle of the harbor without bothering to set it (no wind) and sat in the cockpit reviewing what had happened. I made a time estimate on getting to Port Townsend before dark and decided that if the fog had completely cleared before early afternoon I would peek out of the harbor and if the fog had completely cleared in the Strait of Juan de Fuca I would continue to Port Townsed.

Here is the bank of the harbor from where I dropped anchor in fog:


Several hours later, this is the same view of the harbor as I left it in the sun:


The fog lifted and I crossed the Strait anticlimactically. No wind and a sunny motor to Port Townsend where I dropped anchor for the second time that day by myself. I spent a nice night there and then motored in no wind to Kingston where I did a touch-and-go pick up of my father at Kingston and he helped me dock in Edmonds, WA.

Overall single handing was pivotal. I feel more in control of the boat and a lot more confident in my own skills. Although the fog was an unnecessary risk not to be repeated, it showed me how much I've learned about radar and navigation generally. I have a sense of where and in what conditions I can anchor by myself and at least "un-dock" the boat by myself which I did several times.

Lessons learned:

  • If you are in a safe place and there is fog ahead of you, stay put. If you have an avenue of retreat, and there is fog ahead of you, go back to a safe place and wait it out.
  • If a safety or navigation item in your boat is in need of repair, either repair it or make sure a good spare is handy. We should have fixed our GPS antenna line earlier and if not, we have a handheld GPS and should have had it handy instead of my having to dig it out while simultaneously doing a dozen other things.
  • Don't let stressors (like heavy weather) stop you from thinking clearly about other factors. In other situations this lesson has helped us remember that when we are stressed about a situation, such as docking in a tight spot, that those are particularly good moments to go through all of the safety items needed but not at the top of your mind, such as PFDs, turning down the VHF radio, etc.

Years ago when I was a kid, I used to read Flying magazine. I particularly enjoyed a long-running series of articles entitled "I Learned About Flying From That." Each article was written by a pilot, who humbly admitted to having made a mistake, and then having lived, told about it in the hopes that others would not have to make the same mistake. I thought then that it was a good format, and I still think that now. This series of postings is my attempt to recreate that article series with a new subject and new technology.

(If you would like to help others to learn from your mistakes, please send your article to: WindborneInPugetSound at gmail dot com)

Share/Bookmark

Sunday, March 7, 2010

How To Cut a Mast Boot

(Those of you with deck-stepped masts can skip this post. )

A keel-stepped mast must pass thru the deck. Where it does so, some kind of seal must be made to prevent a deluge of rain water from running down the mast into the cabin. Traditionally, this has been accomplished with a mast boot - a piece of flexible, waterproof material which covers the deck penetration. It is a simple, low-tech solution, one that has withstood the test of time. But: how to cut the fabric so that it drapes smoothly from the mast down to the deck?

It's not hard. Here's how:

To begin, you will need three dimensions:
  • The circumference of the mast. Let's call this 'm'.
  • The circumference of the raised deck ring onto which the bottom of the boot will be clamped. We'll call this 'd'.
  • The height up the mast, measured from the deck, that the boot is to extend. Note that what follows is based on geometry that assumes that the deck ring and the mast have circular cross-sections. If yours is not (and it probably isn't), then add an inch or so to the desired height to allow for some final trimming. We'll call this 'h'.
Make these measurements and write them down.

Now, we need to do a little math - get out your calculator. We need the diameters of the mast and the deck ring:
  • Dm = m / 3.1416
  • Dd = d / 3.1416
Make these calculations, and write the results down.

You will be cutting out a shape that looks like this. We already have 'h', so all that we need now is R1 and R2.

To get R1, we need to do a little more math, using the numbers we have prepared above. Use this formula:

R1 = (h * Dd) / (Dd - Dm)

That is, multiply h by the diameter of the deck ring, and then divide the resulting number by the difference between the diameter of the deck ring and the diameter of the mast.

R2 is much easier:

R2 = R1 - h

With R1 and R2, you are prepared to lay out the pattern on a piece of suitable material (we used white naugahyde purchased from a local fabric store). You will find that R1 and R2 will turn out to be pretty long - you will probably need to do the layout out on the dock. Mark the pivot point on the dock, and set some weights on the fabric (wrong side up) at the right distance. Then make a series of marks using a tape measure at distance R1 from the pivot. Similarly, make a second series of marks at R2.

Connect the marks with smooth curves, and cut it out! Cut a long enough portion of the arc so that there will be an overlap of a few inches (you have the circumferences...). Take it up to the mast and make a trial fit, arranging things so that the overlap is at the back of the mast.

If your mast is not a circular cross section, the top and bottom edges will be wavy instead of straight. Put on the hose clamps top and bottom, and adjust everything as necessary for a nice fit. Using a ballpoint pen, mark at the edges of the hose clamps to get a straight line. Pull off the boot and cut at the line you just marked. When you reinstall the boot, it will now have an even top and bottom.

Do not neglect the seam at the back where the two ends of the boot overlap - it needs to be sealed, or rain water will still find its way below. We used 3M 5200 - it works great!

Finally, seal the top edge to the mast with rigging tape.  Update:  We've found that aluminum tape is a better answer for sealing the top edge.

Now you have a traditional and functional seal between the mast and the deck. Pour yourself a grog, and feel the fellowship of shipwrights who have done this very same task for centuries - you've earned it. Arrrr.


Share/Bookmark

Friday, March 5, 2010

A Little Early Spring Fitting Out

I completed three little projects this past weekend:
  • All winter long, the wind blew. And the inner forestay hummed and vibrated like a guitar string. Apparently due to some weird kind of musical convergence, this vibration causes the turnbuckle holding the stay to unwind. Last spring, when I re-tensioned the rig after installing the new bowsprit, I installed cotter pins or keepers on all the turnbuckles in the rig to keep this from happening. Um... well, except for the inner forestay, that is. Oops. I re-tightened the turnbuckle, and this time I put on the keeper rings.
  • Our VHF radio is capable of including our location as a part of an emergency broadcast... if only it is told where we are. And we installed a new GPS last year, which is capable of telling the VHF our location. All that was missing was the 25 feet of wire between the two devices. This weekend, I bought some 2-conductor shielded microphone wire from Radio Shack and used it to connect them. The only hard part was routing the wire - that took an hour and a half, or about 0.28 ft/min.
  • At the top of our mast boot, I used to seal the boot to the mast with special, long-exposure tape from 3M. This stuff was expensive, and had an outer coating of aluminum powder to resist UV damage. It worked great. But, of course, it is no longer available (at least at the places I have looked). So, at the Boat Show, I found some self-bonding rigging tape. This silicone-based material supposedly welds to itself after being in contact a little while. So I bought a roll and used it to seal the mast boot - it looks very nice, being white, with the white mast and white mast boot. We'll see how it stands the test of time. (This reminds me that I had planned to blog about how to cut a mast boot which will fit both the mast and the larger deck ring, and fall in a smooth line between them. OK, noted - it's now on the list. Done.)

Share/Bookmark

Wednesday, March 3, 2010

Musings on Grandparenthood


Babies take 9 months, more or less. I have frequently observed that it takes all of those 9 months for the parents-to-be to come to grips with the idea of parenthood. In fact, I have observed this quite often lately with Erica and Ken (my daughter and son-in-law), since they are expecting! SHORTLY!

What I have failed to anticipate in all those years of making that observation: it takes at least that long to get used to the idea of grandparenthood.

I have been thru the parenthood acclimatization - with all the awe, amazement, joy, and with the weight of responsibility for a new life that you actually feel fall on your shoulders like a cloak. When it happens, you sense that you are moving forward, that life is being completed, filled in. It is a fulfilling and satisfying time.

Ah, but grandparenthood - that's different. Now, instead of fully entering the comforts of middle age, you are leaving, to old age. But wait - I'm not old! Notwithstanding that an old curmudgeon stares back at me in the mirror now every morning, I feel like I am middle-aged. I have been so for a long time, and I am contented with it. I don't want to give it up. I am comfortable with my delusion, and I want to keep it, thankyouverymuch.

Just as in parenthood, the grandparent (me? you talking to me?) still has responsibility for a new life, but now it is very different - it is all by proxy. The primary responsibility belongs to and must remain with the parents - you can offer hints and the rare sage advice, but you need to stay once removed so that you do not usurp the role of the parents.

Rearing a baby into an adult is the most important task a human being can undertake. And yet it is one that by far the majority of parents are forced to handle with on-the-job training. Very few people get to see the actual results of their efforts in an adult offspring - what worked well, and what maybe should have been handled differently - in time to apply the learnings to the rearing of another child. In point of fact, I believe that is what grandparents are for. They do have the experience and they do have the long viewpoint. But: gently, gently. Can I be subtle? Can I suggest, instead of pronounce? I hope so. But this will not be easy for me.

Seeing your child become a parent is remarkably fulfilling. But stepping into the proxy role, and out of middle age requires a significant change of world view.

I am not quite there yet.

And I am quickly running out of time.

Maybe I should ask the curmudgeon in the mirror for advice - he's old.
Share/Bookmark

Monday, March 1, 2010

Told ya...

When I first talked about marine heads, one of my objectives was to make you familiar enough with their operation that you would be able to operate a head even if it was not a Groco (the example I used, because that was what we had at the time). Well, we've replaced one of our heads with a different brand: a Jabsco. So this provides an obvious opportunity to revisit the "operate any head" manifesto.

Here's a picture of the pump on our new Jabsco head. Look familiar? Well it is more modern looking, but the basics are still there and identifiable. In fact, there are graphics on the pump to help you understand its operation.
  • The big black handle (only about half of which is shown in the picture, at the bottom) operates the pump. Like the Groco, you stroke it up and down to move things along.
  • The flush/no flush valve, which was a hard-to-identify brass lever on the side of the Groco head, is now a big black flipper, with graphics under it to show what happens when it is positioned to the left or to the right. The graphics show that when positioned to the left, pumping will admit rinse water to the bowl, and when positioned to the right as it is in the picture, the bowl will be pumped dry.
This is actually much easier to understand than the Groco, which had no helpful graphics. But, if you knew how to operate the Groco, you'd be able to figure out this one really easily.

Nevertheless, boat etiquette allows for the asking of operational instructions. If you are on someone else's boat and have discovered you have a pressing need, do not hesitate to ask for operational instructions. Heads are all a little different, and in some (the Groco, for instance), the flush valve may not be obvious. Experienced boat owners know this, and will be happy to instruct you on the operation of their head(s), and if fact may do so unbidden. No demerits should accrue to them for doing so, nor to you for asking if they do not.
Share/Bookmark
Related Posts Plugin for WordPress, Blogger...