Showing posts with label ST5000. Show all posts

Wednesday, April 17, 2013

Renewal = removal?

Looking back, sometimes it seems that our time on Eolian has been dominated by deinstalling things and hauling them off the boat, some large, some small, and some almost trivial.  Here's what I remember so far, over the 15 years that we have now been responsible for her care:
  • I think the first think to go back in 1997 was a rusty  suspended metal three-basket set.  It was ugly beyond belief.
  • Remove a whole host of corroded brass doodads that celebrated dolphins. 
  • Remove another host of straw fabrications, presumably procured in Mexico and attached to various places with generous quantities of silicone
  • Removed an ancient battery charger, and eventually the batteries that it ruined.
  • Removed (and refurbished) the insulation of the refrigerator
  • Removed and plugged the refrigerator opening that had been cut into the countertop, apparently by a drunken logger with a chainsaw that needed sharpening
  • Removed (and replaced) the refrigerator door
  • Removed (and replaced) the original stove/oven.  This was at least 20% by weight congealed grease
  • Removed a 110V crash pump - a large 110V centrifugal pump.  In a situation that needed it, it was likely that the time spent getting it to prime would have allowed the water to rise up and drown the generator.  
  • Removed (and replaced) 3 bronze head thru-hulls and associated leaking bronze tapered plug valves
  • Removed (and replaced) the original bilge pump, installed when there was nothing else in the hull, apparently.  Spelunking skills were required.
  • Removed a corroded and non-functional antenna tuner
  • Removed an unbelievable quantity of "mystery wire" - wires that went nowhere and caused no end of difficulty in troubleshooting electrical problems.  At today's copper prices, I wish that I had saved it for recycling - I'd be rich.
  • Removed (and replaced) the old bowsprit
  • Removed (and replaced) the old inner forestay pad eye
  • Removed  (and replaced) the old Benmar autopilot
  • Removed the leaking fuel daytank
  • Removed (and replaced) the refrigerator cooling water circulating pump
  • Removed (and replaced) the holding tank
  • Removed (and replaced) the bilge pump controls
  • Removed (and replaced) the forward electrical distribution panel
  • Removed two non-functional diesel filters
  • Removed (and replaced) the stern lite
  • Removed (and replaced) the masthead lite
  • Removed (and replaced) the old microwave
  • Removed (and replaced) the water heater
  • Removed (and replaced) the corroded section at the foot of the mainmast
  • Removed (and replaced) all the running rigging
  • Removed (and replaced) the old cockpit canvas/bimini/dodger/side curtains
  • Removed (and replaced) the old Groco heads
  • Removed (and replaced) all the head plumbing
  • Removed (and replaced) the exhaust elbow
  • Removed (and replaced) the exhaust manifold
  • Removed (and replaced) the alternator
  • Removed (and replaced) all the original instrumentation (except windspeed/direction)
  • Removed (and replaced) the original inverter
  • Removed (and replaced) all the interior cushions and upholstery
  • Removed (and rebuilt) all the cockpit cushions
  • Removed (and replaced) the large fixed cabin windows
  • Removed (and replaced) four of the eight opening ports
  • Removed the original 110V space heaters
  • Removed (and replaced) the original TV
  • Removed (and replaced) the original VHF
  • Removed the LORAN set (replaced with GPS)
  • Removed the remains of the original airconditioning equipment
  • Removed a non-functional oil change pump
  • Removed (and replaced) the mizzenboom gooseneck fitting
  • Removed all the original wood-grain formica
  • Removed (and replaced) all the engine rubber hosing
  • Removed (and replaced) the original fuel level senders
  • Removed (and replaced) the original fresh water pressure pump
  • Removed (and replaced) the original anchor wash-down pump
Woo boy.  I'm pretty sure that there's more, but the list is depressing enough as it is.  And there are investments that don't show up properly in the list, like a new bow lite, or a new inverter/charger.  Many of the removals above constituted their own projects which are documented elsewhere on this blog (you can search either by keyword or by label, over there on the right).

It seems that our waterline should have moved down...


Share/Bookmark

Monday, June 18, 2012

Project ST5000: Finis

The final step in the transition from our old Benmar 14 autopilot to the new ST5000+ was the creation of a place for Ray (yeah, I know it's the obvious name, but still) to live.  The old Benmar was installed in the cockpit coaming, mounted to a decrepitating wood box.  We had gotten used to that position, and in keeping with our desire to not turn Eolian's cockpit into a video game, I decided that the old location would suit.  But the old box had to go.

I bought a sheet of 1/2" UHMW polyethylene and cut the necessary pieces to make a replacement for the wood box.  To make it easier to view the display, I canted the actual autopilot mounting surface back at 20°.  Finally, since nothing sticks to UHMW, I screwed it together using 1" #6 stainless screws.

Ray's new home

Design was a little tricky. The space inside the coaming is not very much larger than the desired size of the new mount.  Thankfully I had the old wood box to use for setting dimensional constraints.  When it was completed, the moment of truth arrived:  Will I be able to get it into the space? 

Yup.  Just.  The 20° taper helped by making the bottom side of the box thinner.
Snug as a bug in a rug
This has been a fun project, but it has gone on for a long time, from inspiration to now.  And now I am finding that there is a gap in my thinking, a gap that used to be filled up with all the various kinds of problem-solving involved with the project.  It's a little unsettling.  But I am confident that another project will soon arise to fill it in.  It's a boat, after all.

Anyone need spare parts for a Benmar 14 autopilot?  I have a bunch...
Share/Bookmark

Wednesday, May 23, 2012

Project ST5000: Rudder transducer is solid

Ray needs a permanent, solid attachment to the rudder quadrant in order to know exactly where the rudder is.  Although it served for initial sea trials and feasibility testing, the string arrangement will never do for a permanent installation.


I cut a piece of the aluminum angle, carefully measured and trimmed so that it fit tightly inside the tapered space under the top flanges of the quadrant, right at the correct spot. This was not exactly easy, and involved many trials with folded paper.

Then to hold it in place, I cut off two more pieces of angle, 1" long. On each of these pieces, I trimmed one leg to 3/16", the thickness of the bronze casting flange of the quadrant.  These were to serve as the clamps, to be held in place with the 1" 1/4-20 stainless bolts, fender washers and nylock nuts.  For the piece d'resistance, I applied a dab of 5200 to the top of each end of the aluminum angle before installing.  I think this is going to stay in place.  And it avoids weakening the bronze quadrant casting by drilling holes in it.

The aluminum angle got an 11/32" hole bored in the exact center to take the ball bolt.  (By the way, if you ever need any replacement parts for your rudder transducer, these are the 10mm rod ends and ball bolts that are used with gas struts.  Search for them that way.)


Finally, I measured the amount of the M6 all-thread needed (the distance between the ends of the black nylon rod ends, plus the distance that the rod screws into one of the rod ends.  This way, I am left with the approximately 10mm length of the threaded part  at the other rod end for possible adjustment).  I cut the stainless all-thread to this length.

Installed with a lock nut and washer at each end, and voilĂ , Ray gets a solid, repeatable, linear report of rudder position!


Share/Bookmark

(not) Marine stores: Tacoma Screw

One of my favorite marine stores is not a marine store at all.

But if you ever need any kind of stainless fastener, there is an excellent chance that Tacoma Screw will have it, no matter how weird or strange it might be.


I stopped in to their Frellard (between Fremont and Ballard) store Monday morning to get the parts I needed to hook up Ray's rudder transducer properly.


Here they are - Marty was able to find everything off the shelf:
  • 1" x 1/8" aluminum angle
  • M6 stainless all thread
  • 2 M6 stainless nuts
  • 2 M6 stainless washers
  • 2 5/16-18 stainless nuts
  • 2 1" 1/4-20 stainless bolts
  • 2 1/4-20 stainless nylock nuts
  • 2 1/4 stainless fender washers
(For things other than fasteners, Ballard Hardware is my first stop.  But that's a story for another time...)


Share/Bookmark

Sunday, May 20, 2012

Hot damn, he's good!

Please welcome our newest crew member: Ray!

Ray steered us tirelessly all over Puget Sound this weekend - doing a much better job than I could have done myself.

In this photo, Ray is helming us across from Shilshole to Port Madison, basically straight west on a compass course of 280° (as always, if you click on the photo, you can see a full-sized version). You can see that in the fierce tidal cross-current, Ray has decided that to get us to follow the desired 280° course, he needs to actually steer 266°. He did this all on his own - I didn't have to prompt him in any way.

Further, he is maintaining that desired course while holding us within 7 feet of our desired track. I am not embarrassed to say that I could not do that, except possibly for a transitory instant.

Ray does not become tired, nor is he distracted by events in the cockpit, or on the water.  Otto, our previous autopilot, would not only get distracted when we crossed a big wake - he would loose his freakin' mind, running the wheel from one stop to the other.  Ray takes it all coolly in stride.

Finally, Ray steers with finesse.  Otto would turn the wheel a minimum of 1/8 of a turn each time he decided that a course correction was required.  Of course, that meant that we zigzagged back and forth over the desired course, never actually settling on it.  As for the track?  Well Otto professed to not know anything about this thing called 'track'.  All he would do is steer a direction.  Poorly.

On the other hand, our new steersman can make the most minute corrections to the rudder position... he actually can accept and properly respond to course correction requests of 1°.

I guess it is time to grant Ray a permanent berth on Eolian.  No more just hanging on his wires in the cockpit - he needs a proper, permanent mount.  The UHMW polyethylene sheeting to make it is on order.

And he also needs a better report of the rudder position.  Tho the glassed in foam block/plywood mount for the transducer is solid, the bailing wire and string setup connecting it to the rudder quadrant needs to be replaced with a real, solid connection.

He has earned it.

Welcome aboard, Ray!


Share/Bookmark

Wednesday, May 9, 2012

Project ST5000: My kingdom for a block of foam

My next step in the ST5000 project is to mount the rudder reference transducer - it tells the autopilot where the rudder is positioned. To do so, I wanted a block of foam to prototype the awkward shape that would be required to provide a surface parallel to the rudder quadrant while mounting to the hull.  This is a difficult problem because there are no benchmarks, and nothing is straight or vertical.  The hull is curved in two planes there, and the rudder shaft is far from vertical - it is canted significantly aft and so therefore is the plane of the rudder quadrant.

So where could I get a block of foam, say a 4" or 5" cube? I asked everyone I knew, and even begged a piece of polystyrene packing foam from a computer monitor, that might work... in a pinch.

And then a miracle occurred: someone discarded two giant blocks of urethane foam at the marina recycling center. I grabbed one, and cut what I needed from it.
Big block 'o foam
This is truly a boon because first, there is more than enough there for several trials, and second it is urethane foam - it will be unaffected by polyester resin. I had originally intended to make a foam block and then recreate it in wood for final mounting.  But with the urethane foam I can just laminate a piece of plywood to the top to provide a platform for the mount screws to bite into and stick it all in place with fiberglass and resin. Yes, I can hear the purists out there saying that I should use epoxy.  Well, epoxy takes hours to cure (and I expect to need multiple applications), and this is, after all, not a structural application.  Polyester resin is perfectly adequate to the task.  So polyester resin it is, and glory be, it goes directly on the foam.


Foam is already shaped here

Now, to shape the foam... how to do it?  I devised this plan:
  • Hold a block of foam in place where I think it should be (mark the hull so that I can locate it there again).  This has to be a place that is close enough to the quadrant to avoid interference problems with the nearby exhaust hose, and far enough away from the quadrant that it won't be hit by it when the rudder is hard over.
  • Using a straightedge laid across the rudder quadrant, mark where the plane of the rudder quadrant crosses the foam
  • Remove the foam and cut on the line I had marked

It took two tries, but here is the result (the black dot is where the center of the transducer goes):

Weird shape, empirically derived

It wasn't easy working in the small access hatch.

Awkward access

(By the way, that nasty rust stain is from a standard plumbing elbow that one of Eolian's previous owners had installed on the exhaust hose to mate up with the bronze discharge fitting. I replaced that rotting mess with a fiberglass elbow a long time ago.)

Now all I have to do is glass it into place.  But that's why there's next weekend...


Share/Bookmark

Wednesday, April 25, 2012

Project ST5000: Initial Sea Trials

We took the boat out this weekend for the first time this year.  And the occasion served as the ideal time for the first trials of the ST5000 under actual operating conditions.

The installation instructions advise that the first task should be to swing the autopilot compass.  The is an easy task - after working yourself thru the menus to the right spot in the autopilot's software, you turn the boat 360° taking at least 3 minutes to do so.  Apparently all is well with the compass location if the maximum deviation discovered is less than 30° - ours was 8°.  At least from the effects of nearby iron (and magnets), the compass location is apparently good.  OK!

So, the Moment Of Truth. Get the boat on a steady heading and... (as Jean Luc Picard says) Engage!

That picture does not give an adequate description of the behavior.  The first time a course correction was needed, the autopilot turned the wheel a little.  And then, apparently not satisfied with the boat's progress in the new direction, it turned it again, a LOT.  The boat immediately overshot and the autopilot then turned the wheel in the other direction, all the way until the limit switches stopped it.  I disengaged it.

I used the rest of the trip to fool with the internal settings, trying to find a way to tone things down a bit.  No joy.

Then I said to myself, "Self, I wonder if the rudder transducer is really a required part of the system?"  So I plugged it in to the back of the ST5000 and, holding it in my hands, I tried to make it do what I thought it would be doing if it were properly installed and hooked up to the rudder.  What did I learn?  That the autopilot is exquisitely sensitive to the rudder position.  So much so in fact, that I believe that the autopilot is actually commanding a rudder angle directly.

Guess I'm going to have to swallow my impatience and go ahead and install the rudder transducer.

The necessary three-conductor shielded wire is now on order.

Share/Bookmark

Thursday, April 19, 2012

Project ST5000: Locating the compass

New autopilot => new compass. Now where to put it? The compass installation instructions advise that the compass should be mounted:
  1. At least 3 feet from major ferrous metal (eg, the engine)
  2. At least 3 feet from radios (because of the magnet in the speakers)
  3. At least 3 feet from other compasses (magnets, again)
  4. On the forward side of a bulkhead
  5. As close to the roll center of the boat as possible
  6. As close to the pitch center of the boat as possible
  7. As close to the yaw center of the boat as possible.
As it turns out, these are conflicting requirements aboard Eolian, given that the roll/pitch center is just about at the top of the engine.

Since this was going to be an experiment no matter where I chose, I first (temporarily... no cutting of cable yet) chose the most convenient location: the bulkhead directly beneath the drive unit, right below the wheel in the cockpit.  This took care of numbers 2, 3, and 4, and wasn't bad for 5-7.

When testing tho, a strange thing happened.  As soon as I engaged the autopilot, it dove wildly to port.  This perplexed me for about a beer.  Then I questioned whether the electromagnetic clutch in the drive unit might be causing the problem.  So I pulled the clutch wire (blue) off of the back of the ST5000 and tested again...  it happily maintained our "course", sitting there in our slip.  so now I have another constraint to add:
  • Mount the compass at least 4 feet away from the drive unit
In fact, in studying this I noticed that the drive unit clutch was also causing a 2° change in the heading shown by the main navigational compass at the wheel!  Worse, I can see no reason that this has not been present since the drive unit was installed, decades ago.  Gonna have to remember to take that into account.

Things are getting more difficult now.  In the "engine room" space beneath the cockpit, I could not find any place for the compass where the drive unit did not interfere. 

So now I could either go forward, or aft of the engine room.  But going forward, I'd have to string wire all the way to forward of the mast to get the compass away from both the engine and the generator.  Going aft, there is a much closer convenient location beneath the berth, near the compass unit for the radar.  Actually, this is pretty close to where the compass for the old Benmar had been mounted (although that unit had been mounted quite a bit off the centerline of the boat, the source, I believe, of that autopilot's inability to track well in a seaway).

I mounted it in the aft location and cut the cable.   We'll do sea trials and try it there for a while.  If it is unsatisfactory, I'll relocate the compass forward of the mast as a second choice location.

Now all we need is some decent weather that coincides with when we have time to get off the dock...

Share/Bookmark

Monday, April 9, 2012

Project ST5000: Cockpit lash-up

I have the ST5000+ now running in the cockpit!  There it is, in front of the old Benmar controller it is going to replace.

By setting it up in the cockpit, I have discovered that I do not have the center of travel between the limit switches anywhere near where the wheel is amidships...  With the wheel centered, it is a turn and a half going in one direction till the limit switch stops the motion, but only a half a turn in the other direction.

I've got to figure out how to recenter things.  Well, I guess that is a full-blown philosophical question...


Update:
Got it.  Here's what I did:
  • Run the autopilot until the limit switch tripped on the side with only 1/2 turn away from center.  Turn off the autopilot.
  • Go down below and loosen the drive unit until I could move it far enough to disengage the chain
  • Back in the cockpit, turn the wheel another 1/2 turn
  • Re-position the drive unit and engage the chain.  Tighten in place.
Perfect.

But I'm still working on centering myself.

Share/Bookmark

Monday, April 2, 2012

Project ST5000: All buttoned up

Almost ready for the first sea trials. That picture shows the Benmar drive unit installed back in its place under the cockpit sole. The spare unit I used to do the prototype work is back under Jane's berth.

And I just received notice that a UPS package has been delivered - could it be the wire to hook up the compass?

Other than stringing this wire (never simple or easy on a boat), we are about ready for the first sea trials - without the rudder reference transducer. The autopilot will work without the rudder reference (see the St4000, which does not use a rudder reference), but it will work better with one.

Installing the rudder reference transducer will be nearly a project in its own right. Later.


Update:  For the initial sea trial, I will *not* permanently install the compass.  Instead, I will duct tape it to a suitably vertical surface in the cockpit.  That way I don't need to pull wire to do the initial testing.

Share/Bookmark

Monday, March 26, 2012

Project ST5000: Step by step

Disclaimer
Performing these tasks is fraught with opportunities to destroy the ST5000 autopilot, the Benmar drive unit, or both.  Take nothing here as directions on how to modify the Benmar drive to be controlled by the ST5000 - instead, this is a guide to understanding what I did with my drive unit. Your drive unit may be different.


Finally, if you are not comfortable with electricity and electronics, do not attempt this conversion.  You must be able to understand fully what needs to be done and you must take full responsibility for making the changes necessary on your drive. 


I accept no liability for your failure to successfully convert a drive because:
  • These directions may be faulty.
  • Drive units may vary
  • Your skill level may not be up to the task
  • Your understanding may be incomplete
all of which can lead to failure and destruction of the ST5000, the drive unit, or both.

I know that what follows fails as a recipe for making the conversion.  Actually that is on purpose.  If someone were to blindly follow a recipe, it would almost certainly lead to an expensive failure. 


That said, join me on my journey to understand the ST5000, the Benmar drive, and learn what I did to convert my Benmar autopilot drive unit to make it compatible with my ST5000:
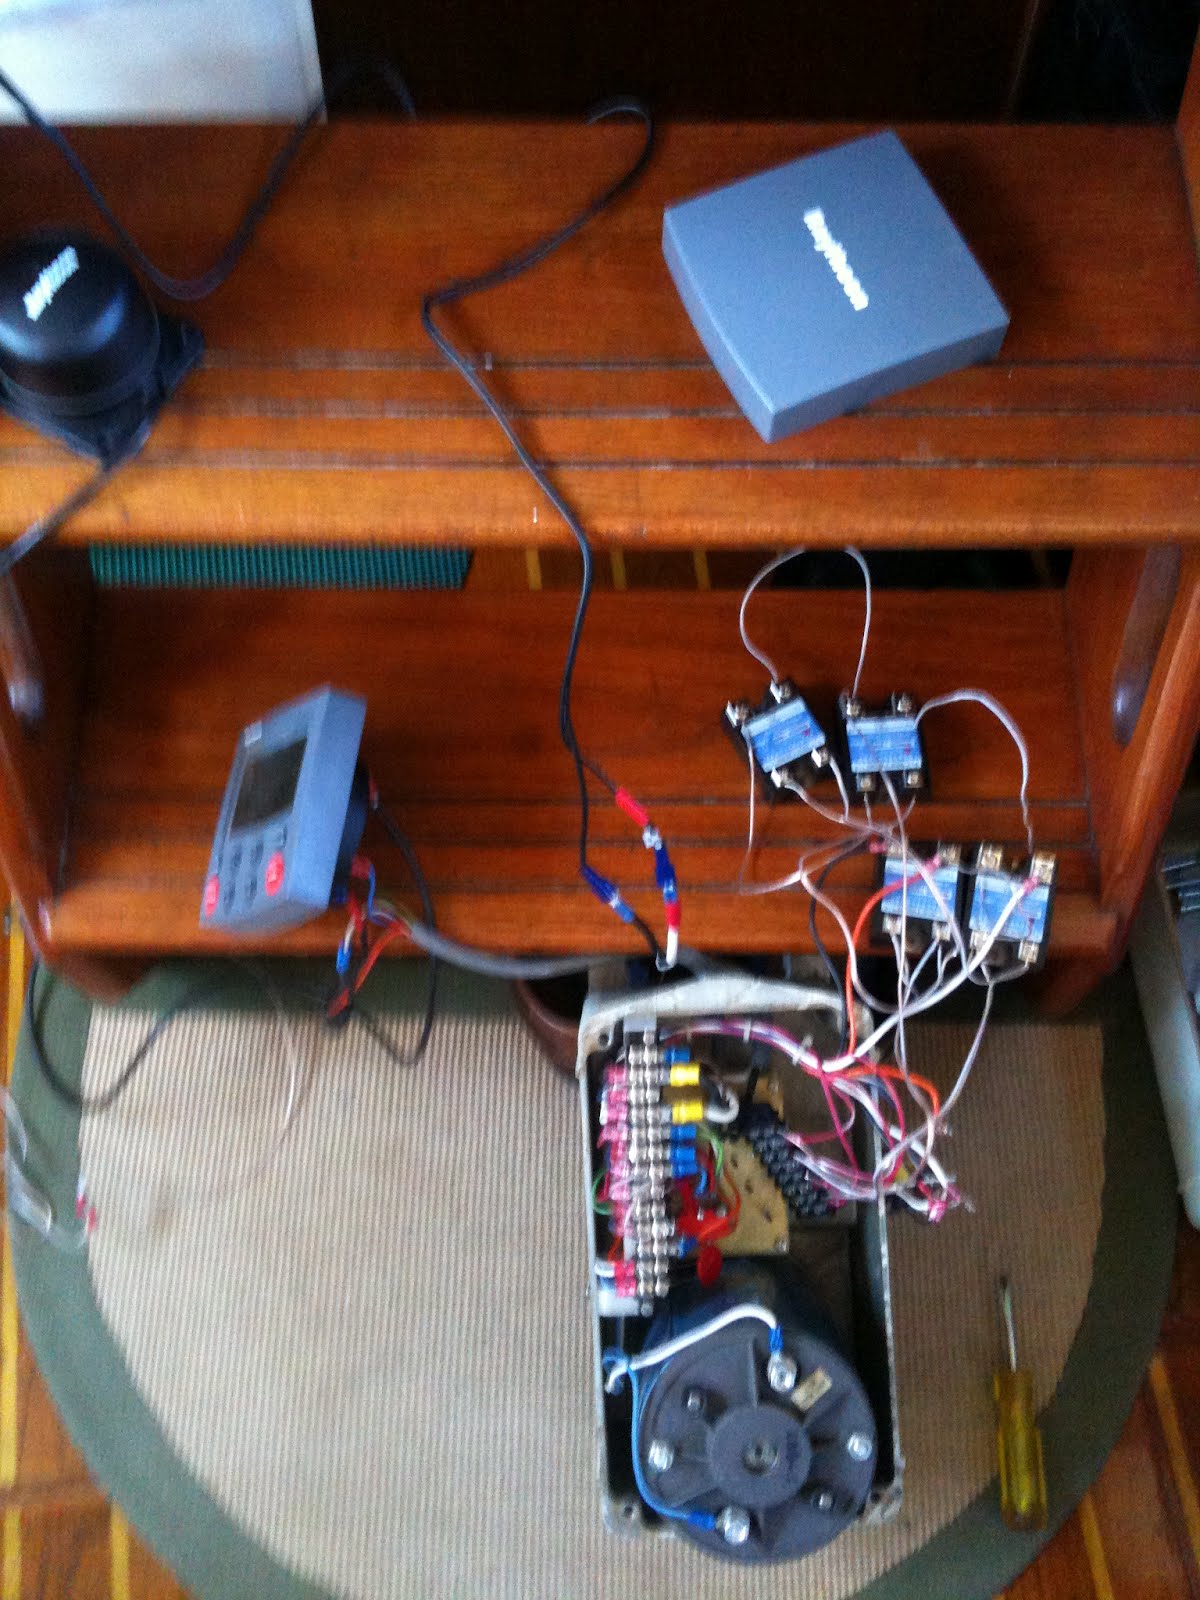
  1. Remove the cover from the drive unit.  This is on the opposite end from the drive sprocket.
  2. Remove the two screws that hold the aluminum plate containing the two large and one small relays from the case, freeing the plate and its relays from the case.  
  3. The two large relays control the drive motor, and the smaller relay controls the clutch.  We will not disturb the clutch relay at this point.
  4. Locate the two heavy orange wires coming out of the wiring bundle and disconnect them from the relays.  These wires each connect to one side of the motor.
  5. Locate the two thin red wires coming out of the wiring bundle and disconnect them from the relays.  These come from the limit switches, and are one side of the relay control wires.
  6. Locate the two thin red wires with white stripes coming out of the wiring bundle and disconnect them from the relays.  These are duplicates for the other side of the relay control wires.
  7. Locate the two heavy white wires coming out of the wiring bundle and disconnect them from the relays.  These are the DC +  feed.  On one of the relays, you will also find a thin white wire under the same screw as the heavy white wire.  Remove it too.  You will also find that there are a white and a black wire going to the relays from a capacitor (silver cylinder) bolted to the aluminum plate.  You may ignore these for the moment.
  8. Locate the two heavy black wires coming out of the wiring bundle and disconnect them from the relays.  These are the DC - feed.  On one of the relays, you will also find a thin black wire under the same screw as the heavy black wire.  Remove it too.  
  9. You should now find that the wire bundle is free, except for the two wires going to the capacitor, and the blue and white/blue stripe wires going to the clutch relay.
  10. Clip the nylon wire ties holding the bundle together and unthread the wires you have loosened.  You will find that they fall nicely into two groups - one long and one short, each for the particular relay that they had been attached to.  You will also find that you have freed a white and black wire pair going to the clutch relay.
  11. Looking at the underside of the aluminum plate, remove the single screw holding the clutch relay to the plate.  This should now allow the plate and the still-attached old motor relays to be removed completely.  Find a longer 6-32 screw and attach the clutch relay to the case thru one of the holes that used to hold the aluminum  relay plate - the hole furthest from the corner of the case is the preferable mount point.
  12. Tho it might seem most convenient, we cannot simply attach the new SSR's to the aluminum plate in place of the old mechanical relays.  The plate is not an adequate heat sink.  We are going to use the cast aluminum case cover as the heat sink.
Now, a little rearrangement of the wiring on the big terminal block in the drive. The purpose of these changes is to reverse the connections to the limit switches so that the common wire is connected to one of the incoming control lines, and the individual switched connections will go to the diode-controlled control lines. The numbering is done counting from the end closest to the motor.
  1. Locate terminal 8.  The incoming red wire will be attached here.  On the other side of terminal 8, you will see a red/white stripe wire - relocate this wire to terminal 9, under the same screw as the red/white wire already on terminal 9.  Now the incoming green control wire is connected to both red/white wires.
  2. Look at terminal 4.  You will find an orange wire - relocate this to terminal 8.  This connects the incoming red wire to the limit switch common connection.  
  3. Install an MOV across terminals 1 & 2.  This puts it directly across the motor terminals.
After these changes, the incoming green control wire is connected to both the red/white stripe control wires, and the incoming red wire is connected to the two red control wires, via the limit switches.  The idea is that if a limit switch is tripped, the control signal for that rotation direction is interrupted, but the signal for the opposite rotation direction is unaffected, allowing the drive to be rotated away from an at-limit condition.
    I installed an MOV across terminals 4 & 7 of the big terminal block - this puts the MOV across the coil of the clutch relay, protecting the ST5000 from inductive kicks from this coil.

    Purchase an 8-terminal terminal strip - this will be used to insert the diodes in the 2 pairs of control wires.  Pay very close attention to the diode polarity in the schematic - if they are reversed, the SSR's could fail to actuate, or incorrectly actuate creating a dead short across the 12V power, leading to at least the destruction of the SSR's.

    Mount the SSR's to the inside of the case cover.  Be sure that the mounting locations will not interfere with anything inside the drive unit when the cover is installed.  Apply silicone to the aluminum plates on the back of the relays before screwing them in place to insure a sound thermal connection to the case.

    Make the control connections on the relays from the new terminal strip containing the diodes, and make the inter-relay connections on the control lines.

    At this point, before supplying the 12V power to the output terminals on the SSR's, I made a lash-up and actually powered up the ST5000 connected to the drive unit.  I verified that when the ST5000 called for rotation, the opposite corners of the H-bridge were activated (the SSR's have LED's that lite when they are actuated).

    Having confirmed my control wiring, I then made the motor and 12VDC connections to the SSR's output terminals.  Connect the white and black wires from the clutch relay to any convenient white and black wires at the SSR's.  I then used the ST5000 to actually turn the motor.  I did this as a final check to confirm that I had things right, and to ensure that I did not have the wiring to the limit switches reversed.  I didn't, but it was a 50-50 chance.  If I had, then the limit switches would have failed to prevent over-rotation, and it would not have been possible to run the drive unit in the reverse direction to clear the over-rotation condition.  If this had happened, I would have simply reversed the connections of the two red control wires coming from the new terminal strip.

    Hookups at the ST5000:  Everything I did presumed the re-use of the existing wire bundle going from the Benmar drive to the Benmar controller in the cockpit.  Here is where the wires in the bundle at the cockpit need to connect to the ST5000:
    • White:  ST5000 DC + 12V power connection.  Since the ST5000 is a delicate instrument, and is now used only to deliver control-level signals, it will draw very little current.  I installed a 0.5 amp fast-blow fuse in the +12V power lead.
    • Black:  ST5000 DC - 12V power connection
    • Blue:  ST5000 + clutch connection.  No negative clutch connection is required.
    • Red and Green:  ST5000 drive connections.  Don't worry about which goes where - if the sense of the drive is wrong (it rotates the wrong way), just reverse these connections.  The ST5000 also has a software switch for this.
      Of course the compass and the rudder reference transducers will also need to be connected to the ST5000, but these are standard connections, done according to the factory manual.

      Share/Bookmark

      Monday, March 19, 2012

      Project ST5000: The end of haywire and lash-ups

      Since the lash-up tests were successful, I have moved ahead.

      Relays permanently mounted
      First, I have mounted the relays in their final position, inside the cast aluminum case cover.  Before mounting, each relay got a dab of silicone on its aluminum back plate to ensure good thermal contact with the drive case.  You can see 4 holes on the end where I originally had two relays mounted - this location did not work out because one of the relays interfered with the main terminal strip in the drive.  For ease in wiring, and because I am visual sort of guy, the relays are physically arranged as they are in the schematic - makes for fewer wiring errors on my part.  In this picture, I have completed the inter-relay wiring.

      All hooked up
      Now that the relays are permanently mounted to the cover, it is time to do the real hookup.  Here you can clearly see the additional 8-terminal terminal strip that is used to insert the diodes in the control lines coming from the H-bridge.  (I think some of those leads are going to be too long, and the wire routing could be better.  Some zip ties are called for as well.)  When I do this in our installed unit, I'll drill a couple of holes in the case for screws to mount the terminal strip.  I plan to just trade the case covers.

      Finally, here's the detailed schematic (as always, click on the picture for a full-sized version):
      I am a little nervous with the inductive kick protection/dynamic braking diodes installed across the output terminals of the relays.  The ones I have used are rated at 1 amp, which seems light.  But they haven't blown yet...

      A little later, I will publish a step-by-step guide to the minor modifications to the drive wiring that are needed to make this work.

      Next steps... take a deep breath and modify the installed drive unit, and then do sea trials.  For this to be effective, I need to at least install the compass temporarily somewhere, and I really need to install the rudder reference transducer.  And pull a lot of wire in difficult places.  It's a big commitment.

      The next step is a big one.

      Share/Bookmark

      Monday, March 12, 2012

      Project ST5000: It's alive!

      The lashup
      It works!  I can control the drive from the ST5000+!  Here's the lashup I have been using to test this.

      I have commandeered the wiring that would normally go to the old Benmar controller in the cockpit to carry the power to the ST5000, and to carry clutch actuation and drive signals from the ST5000 back to the drive, using the same wires that carried those functions with the Benmar controller.   It's that fat grey wire going to the ST5000.  By doing so, I eliminate the need to run a new wire.

      I have to have the compass hooked up in order to get the ST5000 to run; that's it on the step above the ST5000.  But I do not have the rudder sensor hooked up, so the autopilot will eventually alarm that it cannot see rudder movement, and fall back to standby mode.

      Nevertheless, when I turn the compass, the ST5000 will drive the motor back and forth, appropriately, pulse-width modulated, and the limit switches in the drive stop movement when they should.  It's all good.


      Here's a closeup of the wiring.  This will get cleaned up, with the SSR's mounted to the inside of the cast aluminum cover.  A new terminal strip was required to mount the diodes in the control lines - it's black - you can see it hanging loose there, inside the drive case.

      This completes what I originally called Trial install #1.

      I will write up the wiring changes required inside the drive (very few, other than the required removal of the original mechanical relays), and provide a detailed schematic.  Both are partially complete right now.

      Share/Bookmark

      Thursday, February 23, 2012

      Project ST5000: The relays have come in!


      Aren't they pretty?

      (OK, you're probably not as excited about this as I am.   I can understand.)

      Share/Bookmark

      Tuesday, February 21, 2012

      Project ST5000: Report #4

      • I have ordered 4 Solid State Relays (SSR's) via eBay.  They are Mager brand, rated 5-220 VDC load voltage, 3-32 VDC control voltage, 40 Amps capacity and 0.035 ohms resistance in the on state.  That resistance means that the heat generation within the relay will be at a rate of 8 watts with locked rotor conditions on the drive, and about 0.9 watts during drive actuation under normal operation.  This should put heat generation well within the capacity of the cast aluminum case to absorb it.  Yes, they are Chinese - but Mager publishes all the specs.
      • Worked up the wiring path for the ST5000 drive output to the H-Bridge inputs, including the limit switches in the drive unit, using diodes to select the flow path and to protect the inputs of the SSR's from back voltage.  (As always, click on the image for a full-sized version.)
      • Hooked up the drive and my single SSR (left over from another project), and was able to actually observe the autopilot running the drive at slow speed when small course corrections are requested, and at very, very slow speed when only a 1° change in course was requested.  I am very much looking forward to seeing this in actual operation. 
      Now I am (not very) patiently waiting for the relays to arrive, and looking forward to beginning the assembly.   I plan to document and write up the wiring changes that I make in the drive unit, in a step-by-step fashion... for myself as well as for others who may wish to adapt a Benmar drive to a modern autopilot control head.

      Share/Bookmark

      Monday, January 30, 2012

      Project ST5000: Report #3

      My testing workbench
      I have made some progress.
      • The MOV's have arrived (part no. V33ZA70)
      • I have determined that feeding the control inputs to a SSR with reverse voltage results in a 76 mA current flow - probably unacceptable for long-term use.  I got a couple of diodes (Radio Shack, $1.19) which will prevent back-feeding the inputs.
      • The MOV's are temporarily installed - they're the two red disks attached to the terminal strip in the drive... one for the clutch relay, and one for the motor.
      • I have successfully actuated the clutch in the drive unit, using the ST5000+
      • I have successfully activated the drive motor from the ST5000+, using the one SSR that I have. 
      • Irony: reviewing the schematic shows that the output circuit of the ST5000+ is actually an H-bridge.  Which I will be using to feed another H-bridge (albeit one that can handle a lot more current).
      Now some thoughts about specifying solid state relays (SSR's) for the H-bridge... One of the figures of merit for solid state relays is its resistance in the "on" state - indirectly, this is used to rate the current carrying capacity of the units.  Using a SSR from Crydom as an example, the D1D40 (40 amps capacity) has an internal resistance of 0.05 ohms.  Using Ohm's law, the D1D40 will be generating heat at a rate of 80 watts (that's a lot - think about how hot a 75 watt light bulb gets) when carrying full load.  Obviously, this would require a heat sink.  The Benmar drive unit has a 10-amp rated motor in it - that's what it says on the motor.  Actual tests with my installed Benmar show that when the motor is stalled (I'm holding the wheel and preventing it from turning), the load is 15 amps.  But under normal operations, the load is something like 5 amps.  So with the D1D40, I could expect to see heat production at something like 1.25 watts under normal operation, and 11 watts in worst-case, locked rotor conditions. 

      A Crydom D1D20 (20 amps rated capacity; 0.10 ohms internal resistance) would produce twice the heat.  Both Crydom units far exceed the needed current rating, but considering heat output, I am leaning toward the 40-amp unit.  My plan is to bolt the SSR's to the inside of the cast aluminum drive case cover, using it as a heat sink.  If I stick with 40-amp units, and given the intermittent nature of the motor's duty cycle when the autopilot is in use, heat should not be a problem.

      There are a large number of Chinese SSR's on eBay with suitable advertised current carrying capacity.  However, none of these units show internal resistance in their specifications (on purpose?), and many of the ads show the SSR's bolted to large exotic heat sinks.  Tho they are more expensive, I am strongly tempted by the Crydom units.

        Share/Bookmark

        Thursday, January 19, 2012

        Project ST5000: Early findings

        Findings so far:
        • The Benmar clutch relay draws 100 mA.  Plenty of headroom within the ST5000's spec of 2 amps.
        • Yes, PWM* is used for the output in all operating modes.   When set up to drive a hydraulic pump, the duty cycle is higher, but still uses PWM
        • When you press the +1 button (adjust the course 1°), the PWM duty cycle is about 10%.  There is no chance this will operate a relay coil.  The mechanical relays in the Benmar drive will need to be replaced.
        • The PWM frequency is 48 Hz - well within the operating range (multiple kHz) of almost any solid state relay
        • An H-bridge of 4 solid state DC relays can operate a reversing DC motor and will pass thru the PWM.
        • Having soft start and low speed runs for small rudder movements will be a huge boon.  I welcome the PWM overlords. 
        • Update:  I have ordered Allied Electronics part No. 70184710 as the MOV - it will shunt 20 amps at 58V, and cost a thundering $0.67.
        There are no barriers to proceeding.   Next step:  get 4 suitable solid state relays and a big MOV (to quench the magnetic field collapse back currents - the motor is a very inductive load).

        * PWM: an acronym standing for Pulse Width Modulation.  The DC power to the motor is not continuous, but rather is rapidly switched off and on.  The duty cycle is the fraction of the time that the power is on, and can vary from 0% (no power at all) to 100% (full power).  For a familiar example, your microwave uses PWM when you select anything less than full cook power.  When cooking at 80%, it will run the magnetron at full power for 8 seconds, and then turn it off for 2 seconds, repeating (you would measure a frequency of roughly 0.1 Hz).

          Share/Bookmark

          Monday, January 16, 2012

          Project ST5000: And so it begins - thinking out loud

          The old Benmar 14B
          (Remember when schematics came with electronics?)
          You may remember that a long, long time ago I posted a picture showing the bench testing of a Raymarine ST5000+ autopilot (sadly, that post seems to be gone...).

          Well today I start in earnest the process to graft the ST5000+ onto the old Benmar drive.  I am thinking out loud here, while I write this up, so bear with me...

          Why am I keeping the old Benmar drive, you might ask?  Well, for three reasons:
          • It is built like a brick sh%*#house
          • I have a spare
          • It is already installed - no small task by any means

          Basically, to interface with the drive unit, I need to supply +12V on either of two leads to get the drive to steer to port or starboard and a -12V common, and +/-12V to engage the clutch.

          That's it.

          Well, there is one slightly tricky part...  As I just mentioned, the Benmar drive unit has two wires for direction control - basically a port and a starboard wire - and a common -12V connection, while the ST5000+ has  just two terminals, which reverse polarity for port/starboard.  Since relay coils don't care which way the current is flowing thru them, a pair of diodes will take care of interfacing this, presuming that the -12V directional control common on the drive unit is isolated.

          As far as current requirements that need to be met by the ST5000+, everything in the drive unit is driven by relays, so the ST5000+ (which was designed to feed small hydraulic or linear drive motors directly) won't be taxed at all.  For example, the ST5000+ can supply 1-2 amps on the clutch line, but the clutch relay in the Benmar only needs 100 mA.  So the ST5000+ will be coasting.

          The larger issues are these:
          • I want to make the initial installation a "trial" install.  Just in case something doesn't work out.
          • I need to find a place near the roll/yaw/pitch center of the boat to mount the compass.  But unfortunately, that is very close to the engine.  And guess what - you're not supposed to mount the compass near any large masses of iron.  I guess I'll be trying compass locations out...
          • Running the wires will not be easy at all.  Especially considering that I will want to keep the old wiring in place, at least for a while, so I can't use the old wiring as messengers to pull in the new.
          • Mounting the rudder reference transducer will not be fun, hanging headfirst into the compartment beneath the aft berth.  Neither will be stringing wire to it.
          So today, I started by making current measurements.  Well I tried to make current measurements.  Sadly, it seems that my multimeter no longer has a functioning current circuit (no, its not the fuse).  The numbers I quoted above are based on the component values I found on the schematic.

          So stick with me here while I try to figure out my next moves...
          • Get a new multimeter and measure current flows for real.  Check to see if the -12V common lead for directional control is isolated.
          • Trial install #1:
            • Temporarily hook up the ST5000 to the drive unit, with the compass but without the rudder reference.
            • First, ensure that engaging the autopilot causes the clutch to engage.
            • Next, have the autopilot request a course correction - the drive should operate.
            • This trial can be done in the slip, with short wires.
          • Trial install #2:
            • Basically a parallel install with the existing Benmar controller.  This will require a lot more wire to get the ST5000 into the cockpit, where I can actually use it on the water.  At this point, I will also have to have the rudder reference installed.
          • Final install:  
            • Remove the Benmar controller.  
            • Make a proper mount for the ST5000 in the cockpit.
            • Locate the optimum compass location
            • Clean up the wiring.
          At least that's the way it looks from here, right now.

          {Time passes}

          I just went over the schematic yet again...  Unfortunately, I have now convinced myself that the Benmar drive unit has the common -12V lead on the directional control tied to the negative buss inside the drive.  I can easily lift this, but it will require opening up the drive.  Maybe Trial #1 should take advantage of that spare drive...  That would have the further advantage of the trial being completely a bench test, with no alteration whatsoever to the existing autopilot setup.

          Previous post in series

          Share/Bookmark
          Related Posts Plugin for WordPress, Blogger...