For a boat on salt water, corrosion is an omnipresent demon.
Even inside. This is the spout on our galley sink which is piped to a saltwater foot pump. And to the cooling water discharge from our 12V refrigeration system, meaning that it has saltwater flowing out of it whenever the refrigeration compressor is running, as a telltail. Look closely at the inside of the right-hand bend... yup, the aluminum has corroded thru. I don't understand this... aluminum is supposed to be reasonably proof against saltwater. The pipe is clamped to the sink in a plastic fixture, and is connected below the sink via vinyl tubing... ruling out galvanic corrosion. The entire refrigeration system is 12V, so stray 110V current cannot be an issue. The compressor is powered by an external motor thru a V-belt.
But.
The motor and compressor are mounted on the same metal plate, and there are some pressure switches to control the motor mounted on the compressor.
Is that enough to cause stray current corrosion, tho there is no direct connection between the refrigeration unit and the aluminum tubing except via the saltwater itself?
Or is the corrosion simply the result of flowing saltwater washing away the protective oxide layer on the inside of the aluminum tubing? I am very interested in what the net.wisdom has to say about this...
Regardless, this is the second spout that I have installed there, and they have gotten ridiculously expensive. I am not planning to buy a third one.
 |
| Two pieces of 7/16" stainless tubing |
Instead, I bought some thin-gauge 316 stainless tubing from
Online Metals. Now, if you've ever attempted to bend tubing, and especially thin-gauge tubing, you know that it requires special tooling to prevent kinking. The tooling constrains the tube so that it can't collapse and kink while it is being distorted. I looked up what a tubing bender for 7/16" tubing costs on the Interwebs, and Oh. My. Gosh.
OK, a Plan B is needed.
It is also possible to prevent collapse/kinking if the tubing is filled solidly with something incompressible. Apparently some people have used ice (fill with water; freeze), but I was concerned that I'd never get the tubing bent before the ice started to melt. This is where
Wood's metal comes in.
 |
| This is Wood's metal - it is a eutectic alloy of 50% bismuth, 26.7% lead, 13.3% tin, and 10% cadmium by weight. It melts at 158°F |
I just happened to have some.
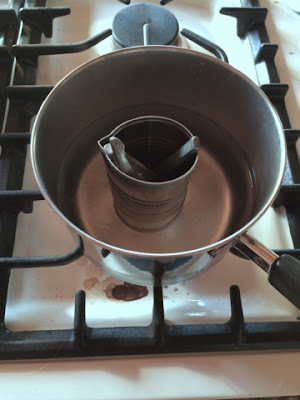 |
| Wood's metal foundry |
For a foundry, I purpose-bought a can of tomato paste (69¢), and froze the tomato paste, retaining the can - just the right size. I put it in a pan with some water and brought the water to a boil - 212°F, or about 50° of superheat. I then poured the molten metal into the tubing (I had previously blocked one end of the tubing by pushing it into a wine cork - we seem to have plenty of these). I then immediately plunged the filled tubing into a container of cold water - I had read that quenching creates a fine crystal structure in the Wood's metal, making it more ductile (read: easier to bend).
OK, now to bend. I created a bending jig and lag-bolted it to a 4x4 in our shed:
 |
| Homemade bending jig |
Yup, it bent just fine - no kinking, no collapse.
 |
| Recovering the Wood's metal |
All that remained was to reheat the bent tubing in another boiling water bath to remelt the Wood's metal and pour it out.
And since our galley sink has two of these spouts (one for salt water and one for fresh water, foot-pumped from the tanks), I made another spout. Gotta be symmetrical, don't you know.
 |
Done
(Clever camera angle conceals dirty dishes in the sink) |
A little
boat yoga, and the galley sink looks better than it ever has!

Corrosion, Corrosion


 Posts
Posts


