Showing posts with label heat pump. Show all posts

Monday, January 21, 2019

On Becoming a Refrigeration Tech

As I mentioned previously, and you may have read, Eolian's heat pump quit working due to lack of Freon.

Never fearing to tackle a new field, I ordered a 5 lb container of R-410a refrigerant and a syringe of leak-stop fluid compatible with R-410a.  Gonna find out if I can be a refrigeration tech...

Before I begin, some basics that I may have discussed before.

Here's how a heat pump works:
  • A compressor pressurizes Freon vapor.  This heats it up (feel that bicycle pump after blowing up your tire...)
  • The hot Freon vapor is passed thru a heat exchanger where it gives up its heat to the cabin air, and condenses to a liquid as it is cooled.  
  • The liquid passes thru a narrow orifice and is allowed to expand into a low pressure space (created by the inlet of the compressor).  This cools it down really cold.  
  • The cold gas is heated up in another heat exchanger , getting heat from sea water.
  • The re-warmed vapor enters the compressor inlet, and the cycle repeats.
Thus, the system extracts heat from sea water and delivers it to the cabin.

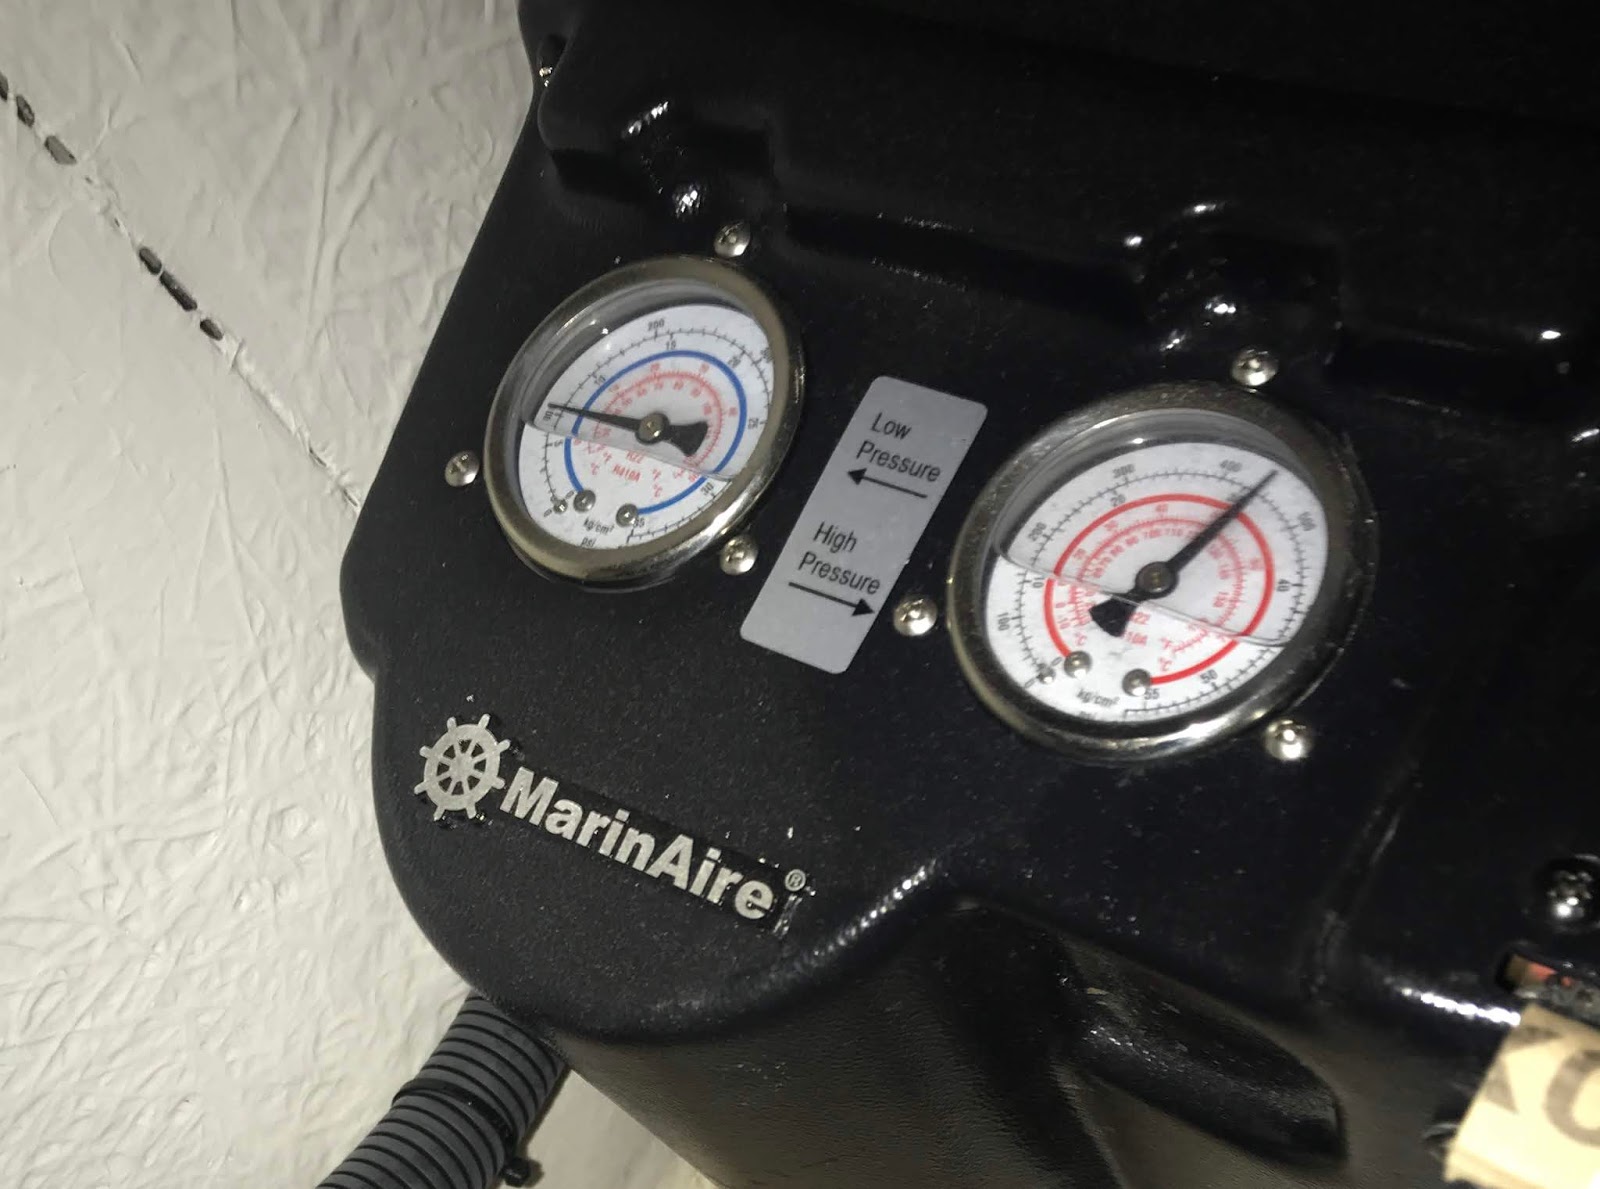
The problem aboard Eolian was that almost all of the Freon had leaked from the system, meaning that there was essentially 0 psi at the compressor inlet when the compressor was running.  With our current water temperature, the inlet pressure should have been around 100 psi.  Outlet pressure should have been 400 psi, but was only 200 psi.  When the compressor was not running, the system pressure was 150 psi, meaning that it was unlikely that any significant amounts of air or moisture had leaked in.

Clearly there was a leak - otherwise the Freon would still be in there.  Thus the reason I ordered some leak-stop.  This came as a blue liquid in a big fat syringe, with fittings to attach it to the low pressure tap in the system.

Here's what we did:
  1. Inject the leak stop:  Jane started the system, the inlet pressure fell to 0, and I injected the leak stop against the lack of backpressure.  I disconnected and Jane stopped the system.
  2. Hook up the Freon cylinder to the inlet port.  Jane starts the system again and the inlet pressure falls toward zero once again.  I turn the Freon cylinder over so that the outlet is on the bottom, meaning I will be injecting liquid.  I open the valve, briefly, and a shot of liquid Freon enters the system.  Inlet pressure rises briefly, and then falls again as the injected Freon evaporates and goes into circulation.
  3. Continue injecting bursts of Freon until the inlet pressure comes up to 100 psi.
Ta Da!  The heat pump is delivering hot air!

Too much is not good
But:  overnight, as the system cycled on and off maintaining out nighttime temp of 63 degrees, I noticed that the compressor was making an uncomfortable noise when starting up.  I assumed that I had over-charged the system, and the the compressor was inhaling a little liquid on startup.

A real refrigeration tech would have evacuated the system with a vacuum pump, and then charged it with *exactly* 1.45 lb of Freon. But I have no vacuum pump and no scale.

So I had charged until I showed the desired pressure on the compressor inlet, but I failed to look at the compressor outlet - it was nearly 450 psi. It should have been a little less than 400 psi. Aside from damaging the compressor by feeding it liquid, too much Freon in the system also meant that the condenser and evaporator would be flooded with liquid, reducing the capacity of the system to transfer heat.

I bled it down until the high pressure side read 400 psi.  Everything seems to be fine now.  Now the only question remaining is whether the leak-stop stopped the leak...  Time will tell.


Share/Bookmark

Friday, January 18, 2019

A January to Remember

One down, one to go
January was quite the month!  In no particular order:
  • Eolian's heat pump quit delivering heat.  It didn't take too long to determine why...  Tho the Freon pressure was acceptable when the compressor wasn't running, the suction side dropped to 0 psi when the compressor started.  We're nearly out of Freon!
    Clearly there is a leak, otherwise the Freon would still be in there.  The operative question is:  Is this a recent, big leak, or is this a long-term tiny leak?  The heat pump is about 5 years old, so I guess either is possible.
    I have ordered and have been delivered of a 5 lb container of the proper refrigerant, and a syringe full of leak-stop.  Now all I need is the opportunity to load those into the system.  But...
  • Tho I am still recovering from the near-paralysis event I experienced late this summer, I had cataract surgery scheduled for January.  If you're not interested in this, skip ahead...
    A most interesting operation - takes about 15-20 minutes, and you are semi-conscious for the duration.  The room is darkened and you are staring into a bright light - you never really see the surgeon open your cornea, slide in an ultrasound probe that destroys your old lens and sucks out the pieces, and then slide in a new lens.  The anticipation is far worse than the operation.
    Here I am the day following - vision still a little cloudy and blurry - I was told to expect that.  But surprisingly, the view thru my new eye is quite different from my old one!  It is as if everything in my old eye is being viewed thru an amber/brownish filter.  Colors are much truer thru my new eye!  A huge and unanticipated advantage! 
    Other eye later in the month.  No more prescription sunglasses!  I can have Polaroid sunglasses!
  • The heat exchanger in our gas furnace at our log cabin developed a leak - we could smell combustion products in the house when the wind blew.  It was under warranty, but the labor was going to be $1700.  Thankfully, the technician that confirmed the perforation of the heat exchanger assigned the cause to under-sized ductwork - ductwork that the technician's company had installed.  They agreed to eat the labor charges, as well as to modify the ductwork at their cost.  That was completed this week.
  • Eolian's TV crapped out.  While we were watching it, it started to cycle thru red screen, blue screen, white screen, green screen, etc.  Nothing would break the cycle, including a last ditch bit of percussive maintenance.
    New TV ordered and installed last week.
  • Tho it has less than 50,000 miles on it, the rebuilt engine that our Suburban's Previous Owner installed in it is obviously failing.  Aside from a defective valve lifter that randomly turns it into a 7-cylinder engine, it consumes a half a gallon of water for every tank of gasoline.  I have found and fixed all the leaks (there were many), but the water consumption continues.  I presume that the intake manifold is leaking into an intake runner (there's no water in the oil).  I have the receipts from the Previous Owner's engine - he got a Chevy long block for $1000 - that is an amazingly low price - apparently too low in fact.
    So the Suburban goes into the auto hospital for a new engine.  My son convinced me that I should save myself for working on the classics in the shop:  65 Mustang, 68 GTO, and the current project, 1959 Impala. So somebody else gets to wrangle this one.
  • Oh, and I figured out how to make my Sailrite LSZ-1 sew successfully with Tenara thread...
And it's worth remembering, the month isn't over yet...


Share/Bookmark

Monday, September 14, 2015

Reluctance

Do I look like a guy happily anticipating a swim?

Today was change-the-zinc and scrape-the-prop day. Surprisingly, the zinc was not as bad as it has been in the recent past, but the prop was a happy little colony of barnacles.

Add caption

Maybe, just maybe we have licked the problem we have had for the last few years with "hot" fittings - where the bottom paint was burned off around a couple of fittings.  I believe that this was being caused by a low-level short (that eventually graduated to a full-on fuse-blowing short) in the circulating pump for our heat pump. Could also explain why the zinc lasted better than it has in recent times.

Yes, Jane did the pour-the-hot-water-down-the-back-of-the-wetsuit trick, and as usual, it worked wonderfully.  Because I didn't want to freak myself out, I didn't check the water temp until I was done and sipping a well-earned beer...  It was 54 degrees. It felt a lot warmer than that.


Share/Bookmark

Wednesday, November 19, 2014

Magnetic Personality?

Like the rest of the country, the Pacific Northwest has been experiencing unseasonably cold temperatures of late (well, ok - for us, 32° is unseasonable).  And of course you know what this means...  our heating system failed.  Just like roof leaks only appear when it rains, heating plants never fail in the summer.  Oh well.

The first clue was that the thermostat display was completely blank.  Well, and the boat was cold, too.  Some back and forth with Marinaire, the heat pump manufacturer (great customer service, by the way), disclosed that there was a fuse on the main circuit board - a fuse hidden with a blue vinyl cover.  Yep, it was blown.  When it was replaced, the replacement blew immediately as the fan and circulation pump tried to start.  Blowing a couple more fuses revealed that the problem was the circulating pump - the pump that provides sea water to the heat pump.  (It is by the chilling of this sea water that the heat pump produces heat.)

Here's the pump after I pulled it out:
Salt water short-out
Yup - the shaft seal failed and sea water was trickling back along the shaft and into the electric motor.  Bzzzt!

So I bit the bullet and ordered a new pump.  This one has a magnetically driven impeller - that is, there is no shaft seal.  The motor drives a cup-shaped magnet; the pump body extends into the cup but has no opening.  The impeller has an imbedded magnet, and is thus driven by the motor without any mechanical coupling and without a shaft seal.  As you might expect, this kind of pump is more expensive.  But the technology is worth it.


As a bonus, the pump body itself (the white plastic portion) is considerably larger than in the old pump, and is much more substantially made.  The inlet and outlet are larger as well.


Since the pump is physically larger, it wouldn't fit where the old one had been.  So there was some fooling around involved in finding a location that...
  • was below the water line as far as possible - centrifugal pumps are not self-priming,
  • was not actually on the floor of the bilge compartment, since that would promote rusting of the motor base,
  • did not interfere with access to the nearby battery, 
  • minimized the required plumbing changes,
  • and finally, did not block the access door you see in the background to the right.
And of course I had to change the plumbing to use the new location.  If you can believe it, I actually ended up with fewer fittings in the new installation!

Based on the appearance of the discharge water stream, I'd estimate that this pump is delivering twice as much water as the old one, even tho both are rated at 500 GPH.

The boat is warm!  And now I expect to be able to forget about this pump for a long while, just as I have been able to with the refrigeration circulating pump.

Magnetic personality?  I must have one.  Can I make a recommendation here?  Avoid sea water pumps that have shaft seals wherever possible.  Like the cosmetic ad says, they're more expensive, but you're worth it.


Share/Bookmark

Wednesday, February 26, 2014

The new heat pump

The dust is settled.  The tools are put away.  And once again Eolian is warmed by a heat pump.  So which one did we choose, and how did we settle on it?

Our old heat pump was a 16,000 BTU model.  This size was just about perfect for Eolian, as confirmed by the past 5 years of comfort.  This is also about the largest size available to work with 110V (larger units require 220V, which we do not have).

In choosing a replacement, I wanted a unit that provided more protection for itself against failures, in particular a seawater delivery fault.  This could happen as the result of a valving error, a seawater pump failure (happened to us), or a blockage of the discharge (happened to us; it caused the failure of the previous unit).  These are the 16,000 BTU units I considered:

Mermaid

This is the brand of our previous unit.  The new version appears to be essentially the same.   The only protection provided is against freon high pressure.    Allows the use of a conventional thermostat.  Condensor not over the condensate pan.  Starting inrush current works on a 20 amp circuit, as confirmed by our old unit.  1.700

Webasto FCF

Physical dimensions too large for us.  Huge inrush current of 38 amps - Webasto recommends a 40 amp breaker.  Must use supplied controller.  This unit is not suitable for boats with 30 amp panels.  1.564

Dometic

Similar to the MarinAire, but without the shroud, gauges.  Also has a different compressor - inrush current requires a 40 amp breaker, like the Webasto.  Not suitable for a boat with a 30 amp panel.  Must use supplied controller.   1.825

Flagship

Their units come by default with electric resistance heating.  Ummm...  this is no different than using space heaters.  They would build me a reverse cycle unit for, if I remember right, 2.300.  Also, the only protection provided is against freon high pressure.  Allows the use of a conventional thermostat.  Rugged-looking units.

Marinaire

This is the unit we settled on, 1.565.

What I like about it:
  • Very well packaged:  sturdy box with polyethylene foam pieces completely filling the voids, multiple strapping, and then the entire thing was shrink wrapped. 
  • Supplied from the factory with liquid-filled high and low pressure refrigerant gauges
  • Extremely low starting current: 17 amps. 
  • The condensate drain pan is stainless.  And it is insulated against sweating.  Three drain locations are provided.
  • The condensor coil tube-in-tube heat exchanger is mounted over the condensate pan.  For a heating application this is critical, since the condensor will be quite cold and will sweat.
  • The fan can be rotated so that the discharge can be pointed in any direction.
  • The fan housing is insulated against sweating
  • The fan is very easy to remove - just loosen a hose clamp and disconnect a Molex connector.
  • With the fan removed, the unit is only 8" wide - it easily fit thru an existing opening in our under-settee location.
  • I see other signs of quality construction.  For example, that fan Molex connector is a locking connector, yet it was also secured with a snap tie, and then secured again with an industrial strength twistie.
  • The unit protects itself against damaging operational conditions with the following sensors:
    • Evaporator coil temperature (freeze up, overheating)
    • Freon high pressure
    • Freon low pressure
    • Provision for insufficient water flow protection
    • Abnormal operation protection (not sure what this entails, but the unit is microprocessor controlled, so it could be almost anything...)
  • Very flexible mounting options. 
  • The unit is entirely covered in a molded shroud.  This protects the delicate plumbing from damage and provides additional sound insulation.
  • The unit is very quiet - really, all you can hear is the rush of air into the cabin.
  • Fan speed is automatically controlled, rising and falling as conditions dictate.
  • Condensor tubing is internally grooved, improving freon heat transfer
  • Evaporator is coated with a hydrophilic coating so that moisture condensing on it (in air conditioning mode) does not bead up but instead runs off in sheets, improving heat transfer from the air.
  • COP of 4.5.  That is, for every kilowatt-hour drawn from the ship's supply, 4.5 kilowatt-hours of heat are delivered.  More simply, the heating efficiency is 450%.

What I don't like
  • No provision for a conventional thermostat - you must use the supplied unit.
    • The supplied unit is not a thermostat; it is a controller.  It is powered from the main unit, with no battery backup.  While its eePROM retains previous settings, the display is off when there is no shore power.  In particular this means that when we are at anchor we have no reading of cabin temperature.
    • The supplied unit only has a single temperature setpoint - there is no provision for having the setpoint automatically drop at night and rise in the morning.  In particular, with this unit I must get up in the cold to turn up the heat.
    • Temperature is not measured at the controller as you might expect.  Instead it is measured at the return air entrance, and reported at the controller.  If the air in the boat is well-mixed, this makes little difference.  If not, the controller needs to be set to a lower temperature to prevent over-heating the boat.
    • The lowest temperature setting that can be set in heat mode is 61°.  With our previous unit, when we were away from the boat I set the temperature to 55°.
Meh items
  • The unit has a humidity management mode.  If we were in a humid climate, this might be important.  But not here in Seattle.
  • The unit comes with a remote control. 
[We also considered diesel-fired heaters, like the Webasto.  These would have had the advantage of supplying us with the same heat at anchor that we have at the dock.  But with diesel at $4-5/gallon, a diesel-fired heater cannot compare cost-wise with a heat pump that delivers roughly 5 kwh heat for every 1 kwh purchased.  The break-even cost would be about $0.76/gallon diesel.  Also, there was the problem of where to run the stack.  Finally, neither of us like the jet-engine noise of the diesel heaters.]
Share/Bookmark

Tuesday, February 18, 2014

On the other side


It's funny how some events can strike a bright line in your life, dividing it into "before" and "after".

Our new heat pump arrived on Saturday, and Angela made it possible for us to pick it up at Dockside Solutions office on Sunday morning (thanks Angela!).  We managed to get it down the dock and onto the boat in between bouts of cold, pouring rain, tho as it turned out, protecting it from rain was probably not as necessary as I had anticipated, due to its superb packaging.

With the background of the electric space heaters' whine, and the fan we have to circulate the heated air the Dickenson produces, I worked most of Sunday to disassemble the unit, get it into place under the settee seating, and reassemble it in place.  I also made inventory of what would be required to permanently mount it and hook it up both electrically and plumbing-wise.

On Monday we made a foraging expedition to various marine stores in Seattle to get the miscellaneous fittings and parts required.  As usual, our trip would have been shorter if we had just gone to Fisheries Supply first.  And then I crawled under the settee once again and got to work.

By Monday afternoon, we had water running out of the boat once again, and blessed heat streaming into the saloon.  I shut down the Dickenson and the space heaters, and there was...  peace.  The heat pump is very quiet.  Very quiet.  The only thing you hear is the rush of air entering the saloon, and even that will be diminished when I complete hooking up the ductwork so that heat is delivered to the whole boat, not just the saloon.

This morning, having slept the whole nite under the aegis of the heat pump, I perceive yesterday afternoon, when I turned on the heat pump for the first time, as one of those bright line events.

And we are on the other side of it.


Share/Bookmark

Thursday, February 6, 2014

Crap

Uh oh...
We've been going thru a cold spell here in Seattle...  several days where it never got much above freezing, and nites in the low 20's.

Tuesday morning when I got out of bed, it was 49° here in the cabin.  That's pretty cold - a few more degrees and we'd be talking about the temperature inside your refrigerator.  I lit the Dickenson and thought about it.  The heat pump was running its little heart out, but it was delivering cold air.  On the other hand, heat pumps are not known for their great temperature rise, so it could have been that the air was so cold going into the heat pump that it wouldn't be much warmer coming out.

But I had a really bad feeling about this.

I stuck a thermometer in the heat pump's air discharge - it was actually colder than the cabin!  Whoa.

Now, I need to note an event that happened in the middle of November.  It was very windy out, and the wind had a lot of easting in it.  That had Eolian shoved against the dock, hard.  And she was surging back and forth, rolling the fenders.  And as it turns out, the outlet for the water which is the heat source for the heat pump is right there by the fenders.  On that morning too, we had awoken to a cold cabin.  I surmised (correctly, it turned out) that the boat's motion had rolled a fender over the water outlet and held it there long enough for the evaporator in the heat pump to freeze up.  I waited a couple of hours and tried the heat pump again, and it worked normally.  At the time, it seemed that that was the end of it.

Thinking that the same thing might have happened on Tuesday, I shut down the heat pump and waited a couple of hours before trying it again.

But when I turned it on, it pegged the ammeter and tripped the breaker.   

<engage engineer's grey cells>

I surmised that the early December freeze-up had cracked the inner tube in the tube-in-tube heat exchanger where the freon is heated by the circulating seawater.  And that it took this long for the freon to slowly leak out.  And that when it was finally all gone, seawater got into the freon tube, made its way to the compressor and hydrostated it.

This morning (Thursday), after having had enough time to get used to the inevitability of things, I pulled the heat pump.  At the moment of truth, I cut the small copper freon line going from the evaporator to the compressor, and was rewarded with a stream of seawater.  Nailed it.

Crap.  It's junk.  But I should be able to sell that copper heat exchanger for maybe $25 as scrap.  That'll at least cover the beer that this incident has required.

So now we are heating with the diesel Dickenson and a couple of space heaters, in what is turning out to be the coldest part of this winter.  But they're keeping up; it's 70° in here.

And I've ordered a new heat pump (ℬ1.565).  This one comes with safeties for:
  • Overheating protection
  • Freeze protection
  • Insufficient water flow protection
  • Abnormal operation protection
  • Low pressure protection
  • High pressure protection
Our previous unit had safeties for:
  • High pressure protection
That's it.

The lack of low pressure protection, freeze protection, and/or insufficient water flow protection was the reason the unit started the slow-motion self-destruct sequence when the water flow outlet was blocked.

Once bitten, twice shy.  It should be here next week.


Share/Bookmark

Saturday, November 16, 2013

Murphy was our dinner guest

What's wrong with this picture?

Last Friday, an hour or so before our dinner guests (the crew of s/v Ghost) were scheduled to arrive, I noticed that our heat pump was blowing cold air.  It had been working fine for weeks/months/years.  Until then.

Of course, with that timing there was no opportunity to look into the problem.  So we lit the Dickenson heater and went on with the dinner as scheduled.  And then when we went to bed, I put out the Dickenson because I don't like to sleep with it lit.

So this morning, it was not exactly warm inside Eolian...  50°F. That's pretty cold sleeping.

And so this morning I had some immediate tasks to attend to.  First was to relight the Dickenson.  Then to make Jane her latte, of course.  Then finally to look into the heat pump failure.

Here's what I believe happened:  Yesterday afternoon and evening were quite windy, and there was enough easting in the wind to have Eolian tight against the dock, surging back and forth against the fenders.  So how is this relevant?

Apparently the movement of the boat had the fenders squished against the outlet fitting where the chilled exhaust water from the heat pump exits, blocking the flow.  Blocking the flow momentarily would not seem to be a major issue.  But with a longer interruption there is a problem.  Recall that the heat pump is withdrawing heat from the water to heat the boat, chilling the water in the process.  With the flow blocked, the water froze in the heat exchanger, permanently blocking the flow, even after the outlet fitting was uncovered. 

When I started the heat pump this morning, water circulation began immediately.  And inspection of the heat exchanger showed that there was no leakage.

Now I gotta relocate those fenders.


Share/Bookmark

Friday, October 26, 2012

Heat pump installation: final step

No job is done until the documentation is done, right? The final step in the project, long overdue: a proper label on the power panel for the heat pump...


It doesn't quite match the style of the Marinetics labels, but Marinetics didn't have one with the right legend, and in any case I think they may now be out of business.  It is a whole lot more professional-looking than the Dymo label I had temporarily applied.

By the way, did you know that you can buy Blue Sea labels individually?  For $1?  And that you can even get custom labels made?  Check it out here.


Share/Bookmark

Wednesday, December 21, 2011

Back to the future!

After six hours, and a trip to West Marine to buy yet another handful of plumbing fittings, we now have a working seawater circulation pump on Eolian, and our heat pump is once again pumping heat.  The original pump was a Cal Pump, and the new one is a Teel pump, manufactured by Dayton, a major, MAJOR pump manufacturer (model # 1P808A, recorded here so that I have it written down somewhere).

I disassembled the Cal pump, and found that the "impeller" was just 4 straight sheetmetal vanes.  I don't know the failure mode because I haven't completely disassembled it, but I assume it to be saltwater moving along the drive shaft past the shaft seal and back into the motor section causing corrosion.

And I have put away the space heaters.
Share/Bookmark

Wednesday, December 14, 2011

Back to the past...

When I arrived at the end of G-dock after having been away from Eolian for a day and a half, I was surprised to see no water coming out of the heat pump discharge.  The sinking feeling I had only deepened when I got down below and found the temperature to be 52°, 10° below the setpoint I had left on the thermostat while we were away.

Yup, the circulating pump which supplies seawater for the heat pump (to chill, thus providing the heat...) was, well, *not* circulating.  The pump motor was warm, indicating that it was getting power, but apparently the impeller was not turning.  I tried flushing the system backwards by directing a stream of water from a hose into the discharge thru hull, but no joy.  And finally, no amount of percussive maintenance (I stopped just short of destructive percussive maintenance) would get it to move water again.

So I dug out the old space heaters (yes, we still have them on board, thankfully!) and plugged them in.  I also lit the Dickenson diesel heater.  So now Eolian is back to being heated the same way she was before the heat pump installation.  And it is cold outside here in Seattle - but never fear, we are cozy here down below.

I called the heat pump manufacturer in Florida, and he promised to have a new pump here in a couple of days. 

We'll see.
Share/Bookmark

Monday, January 17, 2011

Tiny heat pump, with benefits

I've blathered on about our heat pump enough that by now all of you should know how they work:  They use electrical energy to move heat.  Of course, this means that there has to be a heat sourceEolian's heat pump extracts heat from sea water.  And household heat pumps typically extract heat from the outside air.

But here's a heat source you may not have thought of:  condensing water.  A dehumidifier removes moisture from the air by condensing it.  Annnnd... condensing water releases  970 BTU/lb, 1010 BTU/pint.  So is that a lot of heat?

Dehumidifier capacity is typically rated in pints/day.  Ours is a small one, rated at 25 pints/day, or a little better than 1 pint/hr.  Using the numbers above, our little heat pump will deliver 1052 BTU/hr.  It does that while drawing 1.6 amps - that energy (about 600 BTU/hr) also gets delivered into the boat.

So let me put all that into clear perspective for you:
Our little tiny dehumidifier, which draws only 1.6 amps, is the equivalent of an 484 watt electric space heater.
We keep the dehumidifier in the head; this explains why it gets so warm in there when we take a shower.

Of course, these numbers assume that the dehumidifier is working at capacity, and that only happens when the air is very humid, like it is in the head when someone is showering.  At other times, the heat output will be less.  But like all heat pumps, the efficiency will never fall below 100%.

So think of that dehumifier as a tiny heat pump with these side benefits:
  • It keeps the boat interior dry
  • It provides an apparently never-ending onboard source of distilled water
I consider ours to be one of the best $125 we've ever spent.
Share/Bookmark

Monday, January 10, 2011

I love our heat pump!

Today in Seattle is one of those cold grey days when it could snow at just about any moment.

But it is warm and cozy down below.  "Why?" he asked rhetorically.   Well, because the heat pump is busy chilling 48° sea water to near freezing, and dumping the heat recovered from it into the cabin.  This is the stream of chilled sea water leaving the boat.

Life is good.
Share/Bookmark

Tuesday, December 8, 2009

Instinct

\ˈin-ˌstiŋ(k)t\
2b : behavior that is mediated by reactions below the conscious level


All of our 4-legged fellow travelers here on Planet Earth do it. There should be no surprise that we want to too. When the days get short and the temperatures fall, the Nesting Instinct appears.
  • You want to pull the covers over your head
  • You don't want to go out in the morning (Morning? It's still dark!)
  • When you get home at night, there is a powerful urge to settle in, with a mug of hot cocoa or a glass of wine (both? would that work?) and do quiet things
It was 22° F here in Seattle this morning. I definitely wanted to stay under the electric blanket (set to "beach", as Jane said last nite). Most specifically, I didn't want to get up at 04:00 and light the Dickenson diesel heater. But when it is this cold, the heat pump can't keep up, and needs some help to warm the boat up from the nighttime temp of 60° F to the daytime temp of 70° F.

So I got up. The cabin sole was cold. I got the heater going. And then I crawled back into the bed again, and pulled the blanket over my head.

It was a double blessing - I got to experience that satisfaction of surrendering to the Nesting Instinct twice in one nite.

And it was warm when I *really* got up at 05:15 to make Jane her eggnog latte.
Share/Bookmark

Thursday, November 12, 2009

Project: Heat Pump Permanent Wiring Yoga

There... over there on the right hand side of the picture, near the bottom... See that grey power cord snaking out of the compartment under the dinette seating? That has been our "permanent power wiring" for the heat pump since we installed it last winter.

Now, it is a proven Law Of Nature that the incentive for completing a project is proportional to the amount of the project remaining. Thus, you can approach project completion, but it is difficult to actually get there. This is one of those items. I have been "temporarily" supplying power to the heat pump by plugging it in to a convenient outlet, for a year.

In order to properly wire the heat pump, it needed to have its own breaker in the power panel. And a decision had to be made as to whether to supply the heat pump thru the inverter, or direct from the mains. And since the wiring for the water heater had a PO splice in it and was conveniently nearby, it needed to be replaced too.

But first: power thru the inverter or not? Although the inverter can power the heat pump (I tried it), we would never do that - the battery load is unsustainable. So then, why would I choose to power it thru the inverter, as that was the final decision? The reasoning went like this:
  • We have significant 12V loads on Eolian, even when plugged into shore power. Most notably refrigeration
  • Significant 12V loads mean that the battery charger will be needed frequently, and will need to deliver significant power - not just a trickle charge.
  • In turn, this means the battery charger will require significant amounts of power.
  • The battery charger is actually part of the inverter, a perfect convergence of function
  • Our Heart inverter has a "power sharing" function. That is, you can program the inverter/charger to use a maximum amount of 110V power to supply its loads (including the integrated battery charger). If the need increases beyond the power sharing setting, the amount of power available to the battery charger is reduced.
  • Loads which are not supplied thru the inverter are unknown to it. Our water heater is wired direct to the mains, and draws about 10 amps. Therefore the inverter has been programmed to take no more than 20 amps for its needs, to avoid exceeding our 30 amp total load maximum.
  • If I were to have powered the heat pump direct, I would have had to reduce the load sharing setting to 5 amps, since the heat pump draws 12 amps ( the load sharing is in 5 amp increments - there is no 8 amp setting)
  • 5 amps is not a reasonable amount of power to share amongst the battery charger and all the power outlets on board.
  • By powering the heat pump thru the inverter, I can leave the power sharing setting at 20 amps. If the heat pump is running, there will be a maximum of 8 amps available to the battery charger - not enough to run refrigeration, so at least part of the refrigeration load will come out of the batteries. But as soon as the heat pump shuts off, the battery charger wants the full 20 amps to replenish the batteries.
This was a good decision - it works well. In fact, by running for a year with our "temporary" setup, we were already running thru the inverter, since the outlets are powered that way. We have had a successful one-year trial.

Now for implementation. The under-seating compartments all had to be completely emptied. The heat pump is in the compartment behind the teak-surrounded white grill (far right), the water heater is in the next compartment to the left (with the solid teak door), and the power panel is below the nav station desktop (accessible only thru the small opening, awkwardly oriented the wrong way).

Stringing the wire was not difficult, nor was terminating it at the water heater and the heat pump (other than the joy of wedging my body into those small spaces to do the work). Most of the effort was spent with my head and shoulders down in that small opening in the nav station, reconfiguring the breakers and wiring behind the panel. Jane got a particularly unflattering picture of me, immersed in the work...

So, we have accomplished the impossible: we have reached the asymptote - the project is complete!

Yoga? Who needs it?
Share/Bookmark

Sunday, April 19, 2009

Weekend Report 4/19: Heat Pump

The heat pump which has been keeping us warm all winter was not really installed. Last fall when I got it, I kind of jury-rigged the install in order to get it up and running. Today I tackled one part of that jury-rigging: I positioned the heat pump in its final location and bolted it down - a prerequisite for us to be able to go sailing (wouldn't do to have it flopping around down there).

In order to do this, it was necessary to make a giant mess of the cabin, of course. I uninstalled the ductwork, the water plumbing, and removed all the other non-heat pump stuff in the compartment.

Last week, Jane picked up the collection of stainless nuts, bolts and washers that I figured would cover any installation eventuality, so I was prepared to do the bolt down. I drilled the holes and test-fitted the bolts. They didn't work - the threaded length was not sufficient. So, since I needed more water hose anyway, we left the mess and made a trip to West Marine. With the proper bolts and 14' of hose, I once again wedged my tender body into the small space under the dinette seating. The first two bolts went in without a hitch, and required maybe 10 minutes to make up. The last bolt, however, had bad threads part way down its length. After I essentially welded the nut on (stainless galls up easily) by trying to turn it past the bad place, I gave up and hacksawed it off. I invested a good hour in this last bolt. Jane made a quick trip back to West Marine to exchange the defective bolt, while I caught my breath. The replacement bolt went in easily, and all I had left to do was to cut off the excess ductwork (left long in the initial "install" on purpose), and hook up the new hose.

Done. Remaining: permanently mount the water circulating pump, and provide permanent 110V wiring.

I also completed the fabrication of a new teak door and frame for what is now the heat pump compartment. This door incorporates a return air vent, needed because the heat pump has to get the air it blows throughout the boat from somewhere. The new door and frame is larger than the previous one (to get adequate return air), and so the opening will have to be enlarged. I think it is going to look OK once it is mounted and varnished. Don't you?
Share/Bookmark

Sunday, March 29, 2009

Weekend Report 3/29: Heat Pump Installation

As I mentioned last week, we are still putting the finishing touches on the heat pump installation. One of those finishing touches is to protect the flexible ductwork in the storage compartment under Jane's berth from the heavy things that are normally stored there.

The first step was to cut some cleat stock out of some scrap lumber, and glue/screw it to the surfaces surrounding the ductwork, to provide a foundation.

Next, making templates out of cardboard saves lumber, and allows you to change your mind about the design at zero material cost.

Once I settled on a design, I used the templates to mark up the plywood, cut it out with a saber saw. Because everything is made to fit, it fits perfectly (OK, I was surprised too).

After all the pieces were cut, I glued on more cleat stock in the appropriate places, and then assembled the whole thing.

A little sanding, a couple of coats of paint, and it looks like a factory install (almost).
Share/Bookmark

Sunday, March 22, 2009

Heat Pump Installation

Another short Weekend Report; another bonus project report. But it is a current one - we are still working on cleaning up and finalizing the initial installation.

I had always thought heat pumps were the perfect answer for heating/cooling on a boat, but never considered one due to their cost. When I saw a two-year old one on craigslist for less than 1/4 the retail cost, I jumped without hesitation.

(An aside to those who do not know how a heat pump works: A heat pump is almost exactly like an air conditioner, but with the addition of solenoid valves which allow reversal of the freon flow. Did you ever notice that a running window air conditioner blows hot air outside? That is the heat which was removed from the cooler inside. If you were to physically turn the unit around in the window, it would become a heater. The solenoid valves allow this reversal of function without having to physically move the unit. And yes, the heat pump is also an air conditioner. One more thing: on a marine heat pump, the heat source/sink is not the outside air, but is instead the water. In Puget Sound, the water temperature ranges from about 55 degrees in the summer to about 48 degrees in the winter, so it is perfect for this.)

Here on the boat, we live on 30 amps. That is, the total amount of power available to us is a little less than what you can get from 2 household circuits. This requires us to be conscious of our electrical usage. With the current price of diesel, it is cheaper to heat the boat with electricity than using diesel in our diesel heater. To do this, we have used 3 space heaters (forward cabin, main saloon, aft head), each set on a 500 watt setting. Thus we were heating with 15 amps, leaving another 15 amps to run the water heater, refrigerator, espresso machine, microwave, lighting, etc. Tho this sounds like not very much heat, it was sufficient until outside air temps dipped into the low 40's, at which time we had to fire up the diesel heater too to make up the difference.

Those 3 500 watt heaters were pulling about 15 amps, and delivering about 5100 BTU/hr. The heat pump, when in heating mode, draws 12 amps, and delivers 18,000 BTU/hr. That is, the heat pump delivers more than 3 times as much heat, and uses less power to do so. That is because not only do we get the energy from the 12 amps drawn from the electrical circuit, but this energy is used to MOVE heat, so we also get the heat captured from the sea water. We also get air conditioning, but that is seldom needed in this climate.

The heat pump is about the size of a window air conditioner, but without the external housing. Unfortunately I didn't take any pictures before I got it into the fwd settee compartment. Because of its size, it was necessary to remove both the door and the bezel from the large opening. It just fit. Next, the unit requires a supply of sea water for its pump. For now, given that we are in the heating season, I stole the connection for the generator, and I made use of an abandoned above-the-waterline thru hull for the discharge. The initial installation just had the giant 6" hot air discharge hose led back out the door. And although this kept the main saloon toasty warm, it left the ends of the boat cool.

So to string 4" flexible aluminum ductwork (think dryer hose) from the compartment to carefully chosen locations for heat registers... I rented a big (BIG) electric drill and a 4.5" hole saw. This is a monster. It takes two hands and all my strength to keep this thing going in the right direction and not jumping out of the hole and chewing up everything in sight. And given that all the duct locations are run thru the backs of the small compartments along the port side of the boat, running the hole saw to make the holes can best be compared to wrestling with a pit bull while under your kitchen sink, with the door closed.

There were a lot of holes to be cut; each took between 30 and 60 minutes to make.

I found the 4 - 4" grills for the cabins and heads on the internet, but the 6x10" grill for the main saloon is made of a conventional grill, with a teak overlay bezel (that I made) in place. Thankfully, the giant silver snake is gone from the saloon.

We are warm and cozy, and when you hang up a towel in the head, it is dry the next time you use it, instead of just cold. The boat has never been this warm, and yet the heat pump runs just a fraction of the time, and is far quieter than the fans in the 3 space heaters. We also now have a smart programmable thermostat which allows us to have the boat cool when we are absent or asleep and warm when we are here, automatically.

OK, you people in houses have had these for a long time. For us it is a new luxury.
Share/Bookmark
Related Posts Plugin for WordPress, Blogger...